


spring-boot开发案例
创建idea中的SpringBoot项目
Spring Boot是搭建程序的脚手架,它的作用就是帮javaer快速搭建起后台服务,将注意力集中在业务编码上,避免被项目启动等一系列问题困扰
spring-boot和spring-mvc是不冲突的,共存的,spring-mvc是一套java-web的代码规范,spring-boot是帮开发者快速搭建起spring-mvc架构代码的脚手架,封装了启动和基础代码添加能力
使用ideal创建一个spring-boot项目,只需要在新建时选择Spring Initializer创建即可,服务器url选择默认的https://start.spring.io/、http://start.springboot.io/(已不支持jdk8),或选择https://start.aliyun.com/
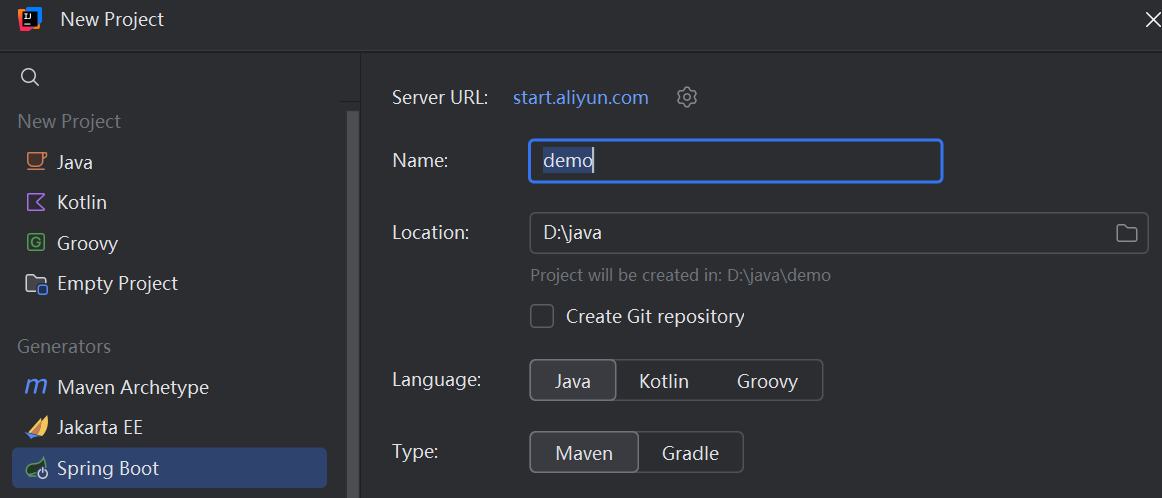
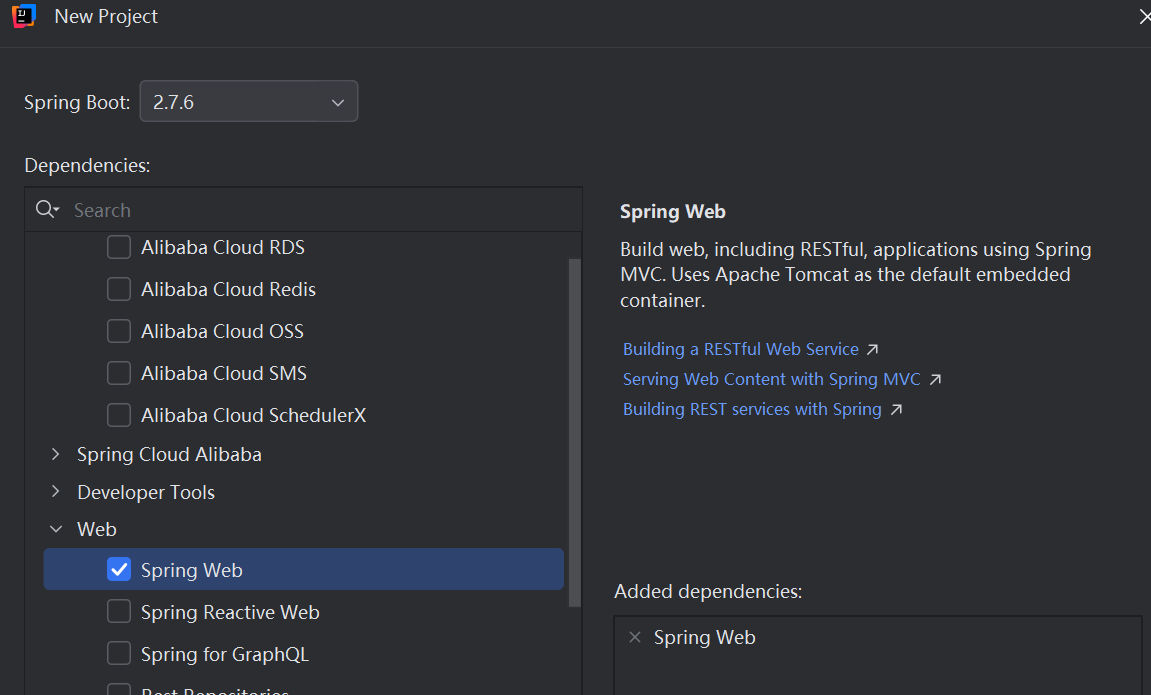
版本选择spring-boot常用的版本如2.7,依赖可以添加Spring Web
SpringBootApplication和main函数
创建好的项目中已自动关联了pom依赖,并且创建了一个被@SpringBootApplication注解的main函数
@SpringBootApplication
public class SpringbootstudyApplication {
    public static void main(String[] args) {
        SpringApplication.run(SpringbootstudyApplication.class, args);
    }
}
启动main函数,在ideal的控制台可以看到输出的日志包括:
// java版本、进程号
Starting SpringbootstudyApplication using Java 1.8.0_332 on DESKTOP-73L7LV6 with PID 28216
// spring-web组件启动上下文环境
Root WebApplicationContext: initialization completed in 651 ms
// tomcat启动及端口暴露
Tomcat started on port(s): 8080 (http) with context path ''
说明spring-boot已经集成了tomcat,无需再自行集成,在浏览器输入localhost:8080进行验证即可。
spring-boot对restful接口开发
RESTful是一种通用的前后台接口交互格式,使用HTTP POST(或GET)进行数据交互,请求数据和应答数据均为JSON格式(或XML)
对RESTful的详细说明可以参考spring-restTemplate部分
下面是一个Controller层开发案例:
@RestController
public class HelloController {
    @RequestMapping("/hello")
    public String index() {
        return "Hello World";
    }
}

// 下面开发效果和上面一致,但不是以Rest风格约束的
@Controller
public class HelloController {
@RequestMapping("/hello")
@ResponseBody
    public String index() {
        return "Hello World";
    }
}
启动后使用localhost:8080/hello访问就可以看到Hello World输出了。其中@RestController是@Controller的实现注解,Controller在扫成控制器bean的基础上,添加了解析JSON的能力,是专门对Restful接口开放的
使用@RestController可以不在方法上加@ResponseBody注解,使用@Controller则必须要加,它的作用是将result中的body取出来作为返回值给前端
@RequestMappings是做路径映射的,不区分方法,也可以用@getMapping等方法针对http方法做映射
spring-boot多环境开发
将application.properties分开成application-{profile}.properties,例如application-dev.properties、application-test.properties,同时在主application.properties中增加
spring.profiles.active= {properties}就可以读取对应properties了
同时,也可以在jar包部署的时候指定:
java -jar xxx.jar --spring.profiles.active=test使用java命令指定优先级会高于application.properties中的配置
spring-boot监控
actuator是spring-boot提供的监控类的starter,在pom里面配置坐标,并且在application.properties中做一些端点的设置即可使用
首先添加pom:
<dependency>
    <groupId> org.springframework.boot</groupId>
    <artifactId>spring-boot-starter-actuator</artifactId>
</dependency>在application.properties设置端点开启和暴露,management.endpoint.xx.enabled设置端点启用,默认为true启用,management.endpoints.web.exposure.include设置通过http暴露
management.endpoint.beans.enabled=true
management.endpoint.health.enabled=true
management.endpoints.web.exposure.include=health,info,beans此时,通过localhost:8080/actuator/xx即可访问相应的端点,例如beans端点
常用的端点包括:
/autoconfig:获取应用自动化配置报告/beans:获取应用创建的所有bean/configprops: 该端点用来获取应用中配置的属性信息报告/env: 该端点与/configprops不同它用来获取应用所有可用的环境属性报告。包括环境变量、NM属性、应用的配置属性、命令行中的参数/mappings: 该端点用来返回所有Spring MVC的控制器映射关系报告。/info: 该端点用来返回一些应用自定义的信息。默认返回空json,需要配合application.properties自定义一些返回信息使用/metrics: 该端点用来返回当前应用的各类重要度量指标,比如内存信息、线程信息、垃圾回收信息等/health: 该端点在一开始的示例中 我们已经使用过了,它用来获取应用的各类健康指标信息。/dump: 该端点用来暴露程序运行中的线程信息/trace: 该端点用来返回基本的 HTTP 跟踪信息/shutdown:用于关闭应用
Starter模式体验
Starter是场景启动器,有一些服务公用的逻辑,例如日志框架、例如ElasticSearch等组件,可能不希望每个微服务都去写一套逻辑,而是有一套可以公用的逻辑,那么就可以将这个公用逻辑以Starter的形式编写出来,发布到本地仓库或中心仓,调用方只需要在pom中引用组件的坐标,就可以通过spring把这套公共逻辑加载到上下文中。这种类似的场景有:
通用模块-短信发送模块
基于AOP技术实现日志切面
分布式雪花ID,Long转String,解决精度问题
微服务项目的数据库连接池配置
微服务项目的每个模块都要访问redis数据库,每个模块都要配置redisTemplate
创建一个starter
创建starter的步骤包括:
创建starter的主要功能 - 接口、接口方法、接口实现
创建autoConfiguration类
在reousrce目录下创建
META-INF/spring.factories文件,声明自动配置路径如果涉及自动配置,可以创建配置元数据类和Properties文件
starter的主体功能
新建一个spring-boot项目,增加代码如下:
public interface HellowService {
    public String sayHellow();
}

@Component
public class HellowServiceImpl implements HellowService{
    @Override
    public String sayHellow() {
        return "hellow!!";
    }
}
包括接口和接口的实现,其中实现仅做了简单的输出,没有启用配置功能
autoConfiguration类
@Configuration
@ComponentScan({"org.example"})
public class HellowServiceAutoConfiguration {
}
配置类没做任何操作,仅做spring扫包配置
org.springframework.boot.autoconfigure.EnableAutoConfiguration=\
org.example.HellowServiceAutoConfiguration完成后即可clean install让boot项目加载到本地maven仓库中
引用starter
引用starter的流程包括:
添加pom依赖
添加Controller调用
pom依赖
创建一个新的idea的spring项目,添加helloboot依赖
<dependency>
    <groupId>com.boot</groupId>
    <artifactId>helloboot</artifactId>
    <version>0.0.1-SNAPSHOT</version>
</dependency>
配置controller
@RequestMapping("/study")
@ResponseBody
public String study() {
    return hellowService.sayHellow();
}启动application类,使用localhost:8080/study就可以看到最终的结果了
SpringApplication启动流程源码分析
SpringApplicaiton - 启动总入口
可以看到spring-boot项目的调用入口是SpringApplication的run方法
public static void main(String[] args) {
    SpringApplication.run(SpringbootstudyApplication.class, args);
}
从run方法一路向下看
run
启动的核心逻辑在这个方法中,其中几个比较关键的点包括:
1. 初始化环境和配置文件,参考prepareEnvironment方法
ConfigurableEnvironment environment = prepareEnvironment(listeners, bootstrapContext, applicationArguments);2. 首先创建ApplicationContext上下文,参考createApplicationContext方法
context = createApplicationContext();3. 执行refresh操作,这个流程与前面AbstractApplicationContext的基本一致
refreshContext(context);执行完refresh后,spring实际上就启动了,但是到这里spring-boot还没有启动tomcat
prepareEnvironment
准备Environment。Environment是Spring所有配置⽂件转换为KV的基础,在启动的时候构造出Environment
ConfigurableEnvironment environment = getOrCreateEnvironment();
configureEnvironment(environment, applicationArguments.getSourceArgs());
这里完成创建和配置
listeners.environmentPrepared(bootstrapContext, environment);调用发广播的方法,这里listeners是run方法中来的
// ---- SpringApplication#run ----
SpringApplicationRunListeners listeners = getRunListeners(args);
listeners.starting(bootstrapContext, this.mainApplicationClass);

// ---- SpringApplication#getRunListeners ----
private SpringApplicationRunListeners getRunListeners(String[] args) {
	……
	return new SpringApplicationRunListeners(logger, listeners, this.applicationStartup);
}可知这里调用SpringApplicationRunListeners#environmentPrepared ,继续跟进看下:
// ---- SpringApplicationRunListeners#environmentPrepared ----
void environmentPrepared(ConfigurableBootstrapContext bootstrapContext, ConfigurableEnvironment environment) {
	doWithListeners("spring.boot.application.environment-prepared",
			(listener) -> listener.environmentPrepared(bootstrapContext, environment));
}
对应方法在子实现EventPublishingRunListener中
// ---- EventPublishingRunListener#environmentPrepared ----
public void environmentPrepared(ConfigurableBootstrapContext bootstrapContext,
       ConfigurableEnvironment environment) {
    multicastInitialEvent(
          new ApplicationEnvironmentPreparedEvent(bootstrapContext, this.application, this.args, environment));
}原来是发广播,跟踪ApplicationEnvironmentPreparedEvent可知,广播的收方在EnvironmentPostProcessorApplicationListener#onApplicationEvent
最后prepareEnvironment中还有一处加载自定义环境的地方:
if (!this.isCustomEnvironment) {
    EnvironmentConverter environmentConverter = new EnvironmentConverter(getClassLoader());
    environment = environmentConverter.convertEnvironmentIfNecessary(environment, deduceEnvironmentClass());
}参考EnvironmentConverter#convertEnvironmentIfNecessary(点我跳转)
createApplicationContext
return this.applicationContextFactory.create(this.webApplicationType);核心代码就一句,这里调用的是this.applicationContextFactory.create,看这个属性:
private ApplicationContextFactory applicationContextFactory = ApplicationContextFactory.DEFAULT;
ApplicationContextFactory DEFAULT = new DefaultApplicationContextFactory();可以发现这里实际调用到的是DefaultApplicationContextFactory中,参考create方法
DefaultApplicationContextFactory - 默认创建工厂
create
return getFromSpringFactories(webApplicationType, ApplicationContextFactory::create,
		AnnotationConfigApplicationContext::new);
这里实际上也是做了一个中转,真正的逻辑在getFromSpringFactories
getFromSpringFactories
创建上下文真正执行主体,首先看方法定义:
private <T> T getFromSpringFactories(WebApplicationType webApplicationType,
BiFunction<ApplicationContextFactory, WebApplicationType, T> action, Supplier<T> defaultResult)根据方法入参可以看出来,参数而是一个BiFunction对应的是ApplicationContextFactory#create方法,Supplier是一个函数式接口,对应的是AnnotationConfigApplicationContext#new方法
看方法执行内容:
for (ApplicationContextFactory candidate : SpringFactoriesLoader.loadFactories(ApplicationContextFactory.class,
		getClass().getClassLoader())) {
	……
}
return (defaultResult != null) ? defaultResult.get() : null;首先是一个循环条件,即通过SpringFactoriesLoader#loadFactories(点我跳转)方法加载出了很多ApplicationContextFactory,然后遍历这些Factory
T result = action.apply(candidate, webApplicationType);
if (result != null) {
	return result;
}在遍历的过程中,调用ApplicationContextFactory#create传入factory、type两个参数,得到结果。
在一个web应用下,传入的webApplicationType一般是SERVLET,这样就调用到了ServletWebServerApplicationContextFactory#create方法,返回了AnnotationConfigServletWebServerApplicationContext上下文类型
这是一种特殊的上下文类型,是spring-boot提供的专门用于内嵌Tomcat启动
SpringFactoriesLoader - 加载Spring.factories文件
loadFactories
List<String> factoryImplementationNames = loadFactoryNames(factoryType, classLoaderToUse);
……
result.add(instantiateFactory(factoryImplementationName, factoryType, classLoaderToUse));这里在加载的流程中并不是只执行一次,factoryType传进来的也有因为有spring自带的jar包,有很多,这里针对每个jar包中的spring.factories都会执行一次,但SpringApplication#run方法执行进来时,factoryType为ApplicationContextFactory,这里拿到的result实际上就只有两个SpringBoot项目中自带的:
ReactiveWebServerApplicationContextFactory
ServletWebServerApplicationContextFactory
每执行一次,都会调用到loadFactoryNames中
loadFactoryNames
String factoryTypeName = factoryType.getName();
return loadSpringFactories(classLoaderToUse).getOrDefault(factoryTypeName, Collections.emptyList());这里在加载的流程中实际上也不是只执行一次的,经过loadFactories都会执行一次,只看SpringApplication#run方法进来的,这里的factoryType的值就是ApplicationContextFactory
每执行一次,都调用到loadSpringFactories中,如果loadSpringFactories方法取不到,则通过getOrDefault取默认值,但是传入的默认值是Collections.emptyList() ,即取不到就是空的了
loadSpringFactories
Map<String, List<String>> result = cache.get(classLoader);
if (result != null) {
    return result;
}
当有缓存存在时,直接从缓存中获取
Enumeration<URL> urls = classLoader.getResources(FACTORIES_RESOURCE_LOCATION);这里取的路径就是在成员变量中写死的
// spring.factories文件的默认路径
public static final String FACTORIES_RESOURCE_LOCATION = "META-INF/spring.factories";因此spring-boot项目正常都会把spring.factories放到META-INF/spring.factories下面
Enumeration是一个老版本的迭代器
Properties properties = PropertiesLoaderUtils.loadProperties(resource);
for (Map.Entry<?, ?> entry : properties.entrySet()) {
    String factoryTypeName = ((String) entry.getKey()).trim();
    String[] factoryImplementationNames =
          StringUtils.commaDelimitedListToStringArray((String) entry.getValue());
    ……
从每个spring.factories中取到其中的键值对,然后进行解析,解析成最终的Names
值得注意的有两点;
值得注意的是,这里解析的并不只有自己实现的boot-starter中的,还包括了很多spring框架提供的原始的
有缓存存在,所以加载spring.factories的流程实际只会执行一次,后续调用进来,直接走缓存
正常情况下,使用springBoot项目启动,加载的是ServletWebServerApplicationContextFactory的实现类:AnnotationConfigServletWebServerApplicationContext
Spring自动化配置源码分析
SpringBootApplication溯源
首先还是回到boot项目案例中的那个main函数:
@SpringBootApplication
public class SpringbootstudyApplication {
    public static void main(String[] args) {
        SpringApplication.run(SpringbootstudyApplication.class, args);
    }
}从@SpringBootApplication注解开始溯源
@EnableAutoConfiguration
……
public @interface SpringBootApplication {
……上面是@EnableAutoConfiguration注解
@Import(AutoConfigurationImportSelector.class)
public @interface EnableAutoConfiguration {
    ……
}再往上是@Import(AutoConfigurationImportSelector.class) 注解,可知核心启动项目可能会在AutoConfigurationImportSelector类中,通过@Import注解加载到了上下文中
在AutoConfigurationImportSelector中有一个slectImports方法,这个方法是查找spring.factories中配置的核心方法。通过ctrl+alt+h查看调用点: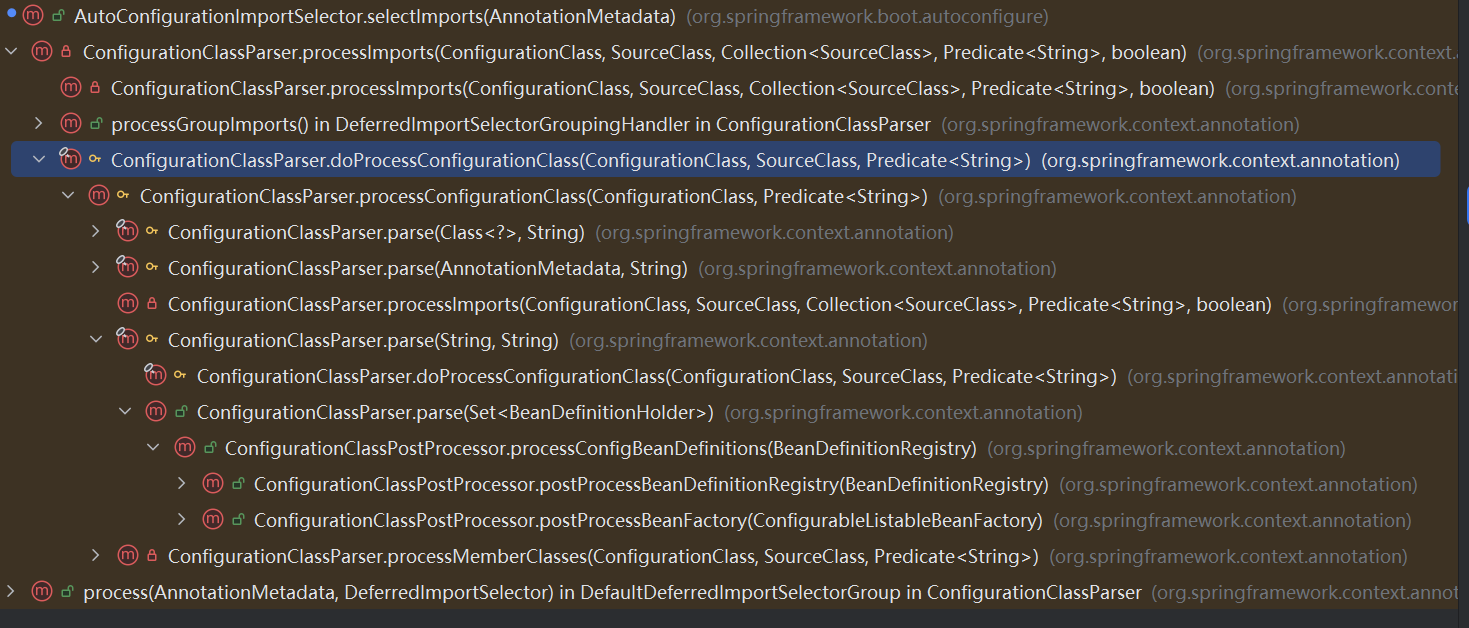
可以看到调用点基本都是在ConfigurationClassParser类中这个类是spring-framework项目中提供的解析@Configuration注解的类,而这个Parser的入口方法parse方法是在ConfigurationClassPostProcessor中调用的
原来是BeanDefinitionRegistryPostProcessor的实现类,可以参考扩展点部分:
根据这个思路可以看出,spring-boot是通过实现BeanDefinitionRegistryPostProcessor接口,在上下文初步加载了BeanDefinition后,通过实例化前的BeanDefinition自定义处理器,添加spring-boot的一些列bean,这一点和mybatis集成spring的逻辑本质上是一样的
可以结合mybatis部分加深印象:
AutoConfigurationImportSelector
溯源
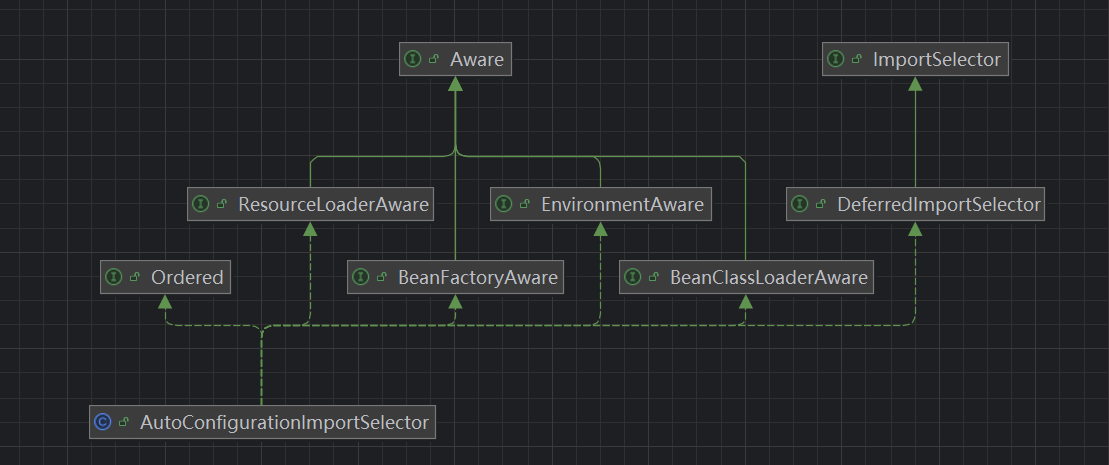
public class AutoConfigurationImportSelector implements DeferredImportSelector, BeanClassLoaderAware,
       ResourceLoaderAware, BeanFactoryAware, EnvironmentAware, Ordered {
AutoConfigurationImportSelector实现了BeanClassLoaderAware、ResourceLoaderAware,、BeanFactoryAware,、EnvironmentAware四个接口,它们的顶层接口是Aware接口,参考下面链接:
此外,AutoConfigurationImportSelector还实现了DeferredImportSelector接口,其顶层接口是ImportSelector
public interface ImportSelector {
    ……
    String[] selectImports(AnnotationMetadata importingClassMetadata);

    ……
    @Nullable
    default Predicate<String> getExclusionFilter() {
       return null;
    }
}实现ImportSelector#selectImport 方法的实现类,要自行实现一种以某种方式加载bean到上下文中的能力,例如本类AutoConfigurationImportSelector,实现的就是从spring.factories中加载bean的能力
前面了解过,ImportSelector的实现类可以通过@Import注解引入到上下文中,其实这是一种约定俗成的用法。与直接用@Service、@Component等注解这些bean,或直接使用xml将bean配置到上下文相比,@Import重点在于三方件的扩展性:
比如我们引入了一个三方件,想将其中的类加载成bean,有以下4种方案:
如果三方件中已经有了spring的配置文件xml,并且在其中已经定义了bean,我们只需要在web.xml的<contextConfigLocation>将该三方件的xml路径添加到环境启动路径即可,对应web.xml的理解可以参考
http://www.chymfatfish.cn/archives/spring-mvc#configureandrefreshwebapplicationcontext 部分如果三方件已经给对应的类加了@Component这类注解,我们只需要在我们自己的配置文件中增加
<context:component-scan base-package="xxxx"/>属性值,让环境能扫描到对应三方件路径即可如果三方件中没有配置文件,也没定义bean,我们的web.xml中已经扫了我们自己的配置文件,那么我们可以直接在我们自己的配置文件中使用<bean>标签定义该bean
如果不想使用xml,三方件也没做任何bean引入,则可以使用@Import标签做引入
因此,@Import标签导入类往往常见于以下场景:
普通类:导入一个普通类,就是为了把它们塞进IOC容器中
ImportBeanDefinitionRegistrar接口实现类:用于一些特殊配置的实现
ImportSelector接口的实现类:会自动调用其中的selectImports方法,方法返回一个字符串数组,其中每个元素都是一个Bean的类名,它们会被Spring容器自动地注入到容器中,即spring-boot中的用法
回到AutoConfigurationImportSelector,它是间接实现了ImportSelector,上面还有一个父类DeferedImportSelector,它的作用是找到延迟导入的bean。它的内部有一个接口叫Group,用于对来自不同导入选择器的结果进行分组,它的特点是:
调用时机:继承该接口的 ImportSelector会在所有@Configuration配置类处理完后运行。这一点是因为在ConfigurationClassParser#parse方法中直到解析出来其他的候选配置类才会调用
this.deferredImportSelectorHandler.process();来解析 DeferredImportSelector如果定义了一个以上的DeferredImportSelector则使用Order接口来进行排序。这一点也是在
this.deferredImportSelectorHandler.process();中进行了排序调用
AutoConfigurationImportSelector实现了Group方法,因此在spring-boot启动selectImport方法时,会先根据Group做分组(可以参考ConfigurationClassParser中的DeferredImportSelectorHandler流程),调用组的process和selectImport方法,而不再直接调用本身的selectImport方法
selectImports
根据血缘分析,可以知道这个方法是为了找一些延迟注册的bean,具体怎么找,也就是去spring.factories中找
public String[] selectImports(AnnotationMetadata annotationMetadata) {
    ……
    AutoConfigurationEntry autoConfigurationEntry = getAutoConfigurationEntry(annotationMetadata);
    return StringUtils.toStringArray(autoConfigurationEntry.getConfigurations());
}
跟进getAutoConfigurationEntry
protected AutoConfigurationEntry getAutoConfigurationEntry(AnnotationMetadata annotationMetadata) {
    ……
    List<String> configurations = getCandidateConfigurations(annotationMetadata, attributes);
    configurations = removeDuplicates(configurations);
    Set<String> exclusions = getExclusions(annotationMetadata, attributes);
    ……
    return new AutoConfigurationEntry(configurations, exclusions);
}核心转到了getCandidateConfigurations这个方法中,取到所有的启动项目,其中是基于ImportCandidates#load 方法
protected List<String> getCandidateConfigurations(AnnotationMetadata metadata, AnnotationAttributes attributes) {
    ImportCandidates importCandidates = ImportCandidates.load(this.autoConfigurationAnnotation,
          getBeanClassLoader());
    ……
}看说明,ImportCandidates#load 方法会解析private static final String LOCATION = "META-INF/spring/%s.imports"; 路径下的所有文件
这里不太好找,实际上被加载的默认类是spring-boot-autoconfigure的org.springframework.boot.autoconfigure.AutoConfiguration.imports 文件,而其中引进来的就是一些Configuration类,用于额外的bean注册
这里是selecImports方法的实现,而要分析其上游的调用点,则要从ConfigurationClassParser#parse方法看
AutoConfigurationGroup#process
public void process(AnnotationMetadata annotationMetadata, DeferredImportSelector deferredImportSelector) {
    ……
    AutoConfigurationEntry autoConfigurationEntry = autoConfigurationImportSelector
       .getAutoConfigurationEntry(annotationMetadata);
    this.autoConfigurationEntries.add(autoConfigurationEntry);
    for (String importClassName : autoConfigurationEntry.getConfigurations()) {
       this.entries.putIfAbsent(importClassName, annotationMetadata);
    }
}核心在getAutoConfigurationEntry方法,这个方法很熟悉,在AutoConfigurationImportSelector#selectImports(点我跳转)方法已经调用过了
也就是说组合单体的处理逻辑其实大差不差,核心都在这里
AutoConfigurationGroup#selectImports
public Iterable<Entry> selectImports() {
    if (this.autoConfigurationEntries.isEmpty()) {
       return Collections.emptyList();
    }
    Set<String> allExclusions = this.autoConfigurationEntries.stream()
       .map(AutoConfigurationEntry::getExclusions)
       .flatMap(Collection::stream)
       .collect(Collectors.toSet());
    Set<String> processedConfigurations = this.autoConfigurationEntries.stream()
       .map(AutoConfigurationEntry::getConfigurations)
       .flatMap(Collection::stream)
       .collect(Collectors.toCollection(LinkedHashSet::new));
    processedConfigurations.removeAll(allExclusions);
    return sortAutoConfigurations(processedConfigurations, getAutoConfigurationMetadata()).stream()
       .map((importClassName) -> new Entry(this.entries.get(importClassName), importClassName))
       .toList();
}
大致可以看出来,在这个方法中做了Entry中内容的梳理和排除
ConfigurationClassParser
parse
再往上找,其实就是ConfigurationClassPostProcessor#processConfigBeanDefinitions 方法,其中ConfigurationClassPostProcessor是BeanFactoryPostProcessors的实现类,方法是从refresh的时候进来的,走到ConfigurationClassPostProcessor#postProcessBeanDefinitionRegistry 方法,最终调用到了ConfigurationClassParser#parse方法
public void parse(Set<BeanDefinitionHolder> configCandidates) {
    // 循环遍历需要处理的配置类
    for (BeanDefinitionHolder holder : configCandidates) {
       BeanDefinition bd = holder.getBeanDefinition();
       try {
          if (bd instanceof AnnotatedBeanDefinition) {
             parse(((AnnotatedBeanDefinition) bd).getMetadata(), holder.getBeanName());
          }
          else if (bd instanceof AbstractBeanDefinition && ((AbstractBeanDefinition) bd).hasBeanClass()) {
             parse(((AbstractBeanDefinition) bd).getBeanClass(), holder.getBeanName());
          }
          else {
             parse(bd.getBeanClassName(), holder.getBeanName());
          }
       }
       catch (BeanDefinitionStoreException ex) {
          throw ex;
       }
       catch (Throwable ex) {
          throw new BeanDefinitionStoreException(
                "Failed to parse configuration class [" + bd.getBeanClassName() + "]", ex);
       }
    }

    //字面理解:处理延迟导入的javabean
    //parse方法,把被处理的类实现DeferredImportSelector接口,加入deferredImportSelectors集合中,
    //处理deferredImportSelectors集合种类
    this.deferredImportSelectorHandler.process();
}
可以看到代码框架是两块:
找到所有的被注解的待加载bean、配置类
处理延迟导入的配置类
其中,找各类注解前面有一个应用案例——分析内部类携带的@Component注解
其中我们看到了,调用到doProcessConfigurationClass方法中,处理了@Component、@PropertySource、@ComponentScan、@Import、@ImportResource、@Bean这几种注解,且之前研究了处理@Component的对应方法:processMemberClasses,研究了内部类是如何被加载到上下文的
而这一次,我们的目标是@Import注解
// org.springframework.context.annotation.ConfigurationClassParser#doProcessConfigurationClass
protected final SourceClass doProcessConfigurationClass(
       ConfigurationClass configClass, SourceClass sourceClass, Predicate<String> filter)
       throws IOException {
    ……
    // Process any @Import annotations
processImports(configClass, sourceClass, getImports(sourceClass), filter, true);对应的核心方法是processImports
而处理延迟导入配置类方法参考:DeferredImportSelectorHandler#process(点我跳转)
processImports
private void processImports(ConfigurationClass configClass, SourceClass currentSourceClass,
		Collection<SourceClass> importCandidates, Predicate<String> exclusionFilter,
		boolean checkForCircularImports) {
	……
		try {
			for (SourceClass candidate : importCandidates) {
				if (candidate.isAssignable(ImportSelector.class)) {
					……
					if (selector instanceof DeferredImportSelector) {
						this.deferredImportSelectorHandler.handle(configClass, (DeferredImportSelector) selector);
					}
					else {
						String[] importClassNames = selector.selectImports(currentSourceClass.getMetadata());
						Collection<SourceClass> importSourceClasses = asSourceClasses(importClassNames, exclusionFilter);
						processImports(configClass, currentSourceClass, importSourceClasses, exclusionFilter, false);
					}
				}
				else if (candidate.isAssignable(ImportBeanDefinitionRegistrar.class)) {
					……
				}
				else {
					……
				}
			}
		}
		catch ……
}
其中方法框架可以大概看出来,处理的DeferredImportSelector实现类、其他ImportSelector实现类、ImportBeanDefinitionRegistrar实现类、其他
因为AutoConfigurationImportSelector是DeferredImportSelector实现类,因此就会走到this.deferredImportSelectorHandler.handle(configClass, (DeferredImportSelector) selector);
其中deferredImportSelectorHandler是默认实现:
private final DeferredImportSelectorHandler deferredImportSelectorHandler = new DeferredImportSelectorHandler();看DeferredImportSelectorHandler#handle方法(点我跳转)
而如果selector不是DeferredImportSelector实现类,则直接调用自己实现的selectImports方法String[] importClassNames = selector.selectImports(currentSourceClass.getMetadata());
DeferredImportSelectorHandler#handle
ConfigurationClassParser的内部类方法
public void handle(ConfigurationClass configClass, DeferredImportSelector importSelector) {
    DeferredImportSelectorHolder holder = new DeferredImportSelectorHolder(configClass, importSelector);
    if (this.deferredImportSelectors == null) {
       DeferredImportSelectorGroupingHandler handler = new DeferredImportSelectorGroupingHandler();
       handler.register(holder);
       handler.processGroupImports();
    }
    else {
       this.deferredImportSelectors.add(holder);
    }
}
是用来处理延迟@Import的,逻辑和process方法差不多
首先把selector封装成DeferredImportSelectorHolder,然后分别调用register和processGroupImports做分组注册和具体处理
DeferredImportSelectorHandler#process
可以看到DeferredImportSelectorHandler的两个成员变量
// 组与组内的ImportSelector的对应
private final Map<Object, DeferredImportSelectorGrouping> groupings = new LinkedHashMap<>();
// ImportSelector中的目标类(被注解的类)与被注解类的封装类的对应
private final Map<AnnotationMetadata, ConfigurationClass> configurationClasses = new HashMap<>();
然后看process代码
public void process() {
    List<DeferredImportSelectorHolder> deferredImports = this.deferredImportSelectors;
    this.deferredImportSelectors = null;
    try {
       if (deferredImports != null) {
          DeferredImportSelectorGroupingHandler handler = new DeferredImportSelectorGroupingHandler();
          deferredImports.sort(DEFERRED_IMPORT_COMPARATOR);
          deferredImports.forEach(handler::register);
          handler.processGroupImports();
       }
    }
    finally {
       this.deferredImportSelectors = new ArrayList<>();
    }
}
创建DeferredImportSelectorGroupingHandler对象,对DeferredImportSelectorHolder类型List进行排序,然后遍历调用
DeferredImportSelectorGroupingHandler#register(点我跳转)方法,将这些deferredImportSelectors分组注册调用
DeferredImportSelectorGroupingHandler#processGroupImports(点我跳转)方法进行解析注册。finally,将容器置为空。
DeferredImportSelectorHandler#register
public void register(DeferredImportSelectorHolder deferredImport) {
    // 获取当前 DeferredImportSelector  的Group
    Class<? extends Group> group = deferredImport.getImportSelector().getImportGroup();
    DeferredImportSelectorGrouping grouping = this.groupings.computeIfAbsent(
          (group != null ? group : deferredImport),
          key -> new DeferredImportSelectorGrouping(createGroup(group)));
    // 将当前 DeferredImportSelector  添加到同一分组中的
    grouping.add(deferredImport);
    // 保存需要处理的配置类,根据传入的ImportSelector存入被注解的目标类的属性
    this.configurationClasses.put(deferredImport.getConfigurationClass().getMetadata(),
          deferredImport.getConfigurationClass());
}方法首先取deferredImportSelector的实现类中的Group概念,即做结果的预测,前面讲过,原生spring-boot代码只提供了一个deferredImportSelector的实现类AutoConfigurationImportSelector,它对应的结果组是AutoConfigurationGroup
DeferredImportSelectorHandler#processGroupImports
public void processGroupImports() {
    for (DeferredImportSelectorGrouping grouping : this.groupings.values()) {
       Predicate<String> exclusionFilter = grouping.getCandidateFilter();
       grouping.getImports().forEach(entry -> {
          ……
       });
    }
}
对已经预分好的组进行遍历,这类遍历的结果,要么是组,要么是DeferredImportSelector实现类本身
看下循环里面做了什么处理
grouping.getImports().forEach(entry -> {
	ConfigurationClass configurationClass = this.configurationClasses.get(entry.getMetadata());
	try {
		processImports(configurationClass, asSourceClass(configurationClass, exclusionFilter),
				Collections.singleton(asSourceClass(entry.getImportClassName(), exclusionFilter)),
				exclusionFilter, false);
	}
	catch ……
});这里看到grouping.getImports().. 也就是说前面DeferredImportSelectorHandler#handle(点我跳转)把selector分组,封装到组里面,这里又取出来了
这里源码里面有猫腻:
public Iterable<Group.Entry> getImports() {
    for (DeferredImportSelectorHolder deferredImport : this.deferredImports) {
       this.group.process(deferredImport.getConfigurationClass().getMetadata(),
             deferredImport.getImportSelector());
    }
    return this.group.selectImports();
}原来是执行了DeferredImportSelector.Group#selectImports和DeferredImportSelector.Group#selectImports方法
因为实现是AutoConfigurationImportSelector.AutoConfigurationGroup,这里看AutoConfigurationGroup#process(点我跳转)和AutoConfigurationGroup#selectImports(点我跳转)
然后依次调用ConfigurationClassParser#processImports方法
Condition机制源码分析
含义和案例
Condition机制顾名思义,就是在某种条件下才加载bean
首先在自动配置类上面增加@ConditionalOnProperty注解
@Configuration
@ComponentScan({"org.example"})
@ConditionalOnProperty(prefix = "study", name = "enable",havingValue = "true")
public class HellowServiceAutoConfiguration {

}
这时候再启动spring-boot会发现启动失败了。如果在application.properties中补充配置:
study.enable=true发现可以启动成功了,这就是Conditional机制
ConditionalOnProperty
@Conditional(OnPropertyCondition.class)
public @interface ConditionalOnProperty {
    ……
}
因为自动配置类上面的注解使用的是@ConditionalOnProperty注解,观察其源码,发现被@Conditional注解了,且对应的校验类是OnPropertyCondition.class
继续跟进@Conditional接口
@Target({ElementType.TYPE, ElementType.METHOD})
@Retention(RetentionPolicy.RUNTIME)
@Documented
public @interface Conditional {

    Class<? extends Condition>[] value();
}
都是些简单注解了,因此直接点击类名看用法:
发现在ConditionEvaluator中有一段:if (metadata == null || !metadata.isAnnotated(Conditional.class.getName()))
因此具体看下ConditionEvaluator#shouldSkip(点我跳转)方法
ConditionEvaluator
shouldSkip
@Conditional校验点的切入点
首先看shouldSkip的调用点:ConfigurationClassParser#processConfigurationClass ,即doProcessConfigurationClass之前先做条件判断:
protected void processConfigurationClass(ConfigurationClass configClass, Predicate<String> filter) throws IOException {
    if (this.conditionEvaluator.shouldSkip(configClass.getMetadata(), ConfigurationPhase.PARSE_CONFIGURATION)) {
       return;
    }
    ……
    do {
       sourceClass = doProcessConfigurationClass(configClass, sourceClass, filter);
    }
    ……
}参考ConfigurationClassParser#parse(点我跳转)
if (metadata == null || !metadata.isAnnotated(Conditional.class.getName())) {
    return false;
}
如果没有注解,注解也不带@Conditional则不能跳过加载bean
List<Condition> conditions = new ArrayList<>();
for (String[] conditionClasses : getConditionClasses(metadata)) {
    for (String conditionClass : conditionClasses) {
       Condition condition = getCondition(conditionClass, this.context.getClassLoader());
       conditions.add(condition);
    }
}
这里的metadata是boot的自动配置类,这两个for循环完成了对于自动配置类上面@Conditional注解和内容的获取,根据注解的传递性,案例中被@ConditionalOnProperty注解的自动配置类拿到的结果是OnPropertyCondition.class
因此这里就直接把OnPropertyCondition.class做入参调用了getCondition方法,getCondition方法内部做的是类的初始化,最终得到了一个Condition的实现类OnPropertyCondition的实例,里面封装了属性值
private Condition getCondition(String conditionClassName, @Nullable ClassLoader classloader) {
    Class<?> conditionClass = ClassUtils.resolveClassName(conditionClassName, classloader);
    return (Condition) BeanUtils.instantiateClass(conditionClass);
}
回到shouldSkip,这里拿到了OnPropertyCondition的实例,就该做判断了
for (Condition condition : conditions) {
    ……
    if ((requiredPhase == null || requiredPhase == phase) && !condition.matches(this.context, metadata)) {
       return true;
    }
}参考OnPropertyCondition#matches(点我跳转)
OnPropertyCondition
继承自SpringBootCondition类
matches
继承自SpringBootCondition#matches
public final boolean matches(ConditionContext context, AnnotatedTypeMetadata metadata) {
    String classOrMethodName = getClassOrMethodName(metadata);
    try {
       ConditionOutcome outcome = getMatchOutcome(context, metadata);
       logOutcome(classOrMethodName, outcome);
       recordEvaluation(context, classOrMethodName, outcome);
       return outcome.isMatch();
    }
    catch ……
}核心代码一共就四句,首先通过getMatchOutcome方法获取对比结果的封装类ConditionOutcome,这一句承担了主要对比流程方法
后面是日志输出和记录
最后一句返回outcome中封装好的匹配结果
getMatchOutcome
OnPropertyCondition自己实现的,它的作用是找到所有的Conditional配置,每个封装成一个条件元素
List<AnnotationAttributes> allAnnotationAttributes = metadata.getAnnotations()
    .stream(ConditionalOnProperty.class.getName())
    .filter(MergedAnnotationPredicates.unique(MergedAnnotation::getMetaTypes))
    .map(MergedAnnotation::asAnnotationAttributes)
    .toList();
首先获取@ConditionalOnProperty注解的全部属性封装到AnnotationAttributes中。在上面案例中只有一个@ConditionalOnProperty注解,因此获得的列表也只有一个元素
ConditionOutcome outcome = determineOutcome(annotationAttributes, context.getEnvironment());对每个条件元素调用determineOutcome方法判断是否符合。这个方法的入参二context.getEnvironment()是一个PropertyResolver,其中已经封装好了SpringBoot项目启动中读取到的所有属性值。
determineOutcome - springBoot的conditional逻辑核心对比方法
Spec spec = new Spec(annotationAttributes);通过一个内部类承接一个condition元素的所有属性,可以看到Spec类的成员变量跟定义的@ConditionOnProperty中的各个属性是一一对应的
private static class Spec {
    private final String prefix;
    private final String havingValue;
    private final String[] names;
    private final boolean matchIfMissing;
……然后通过PropertyResolver进行各个属性取值
spec.collectProperties(resolver, missingProperties, nonMatchingProperties);参考Spec#collectProperties
// org.springframework.boot.autoconfigure.condition.OnPropertyCondition.Spec#collectProperties
private void collectProperties(PropertyResolver resolver, List<String> missing, List<String> nonMatching) {
    for (String name : this.names) {
       String key = this.prefix + name;
       if (resolver.containsProperty(key)) {
          if (!isMatch(resolver.getProperty(key), this.havingValue)) {
             nonMatching.add(name);
          }
       }
       else {
          if (!this.matchIfMissing) {
             missing.add(name);
          }
       }
    }
}
可以看到这里面就是通过封装好的属性集合中找对应的属性,如果值匹配不上,进nonMatching组,如果matchIfMissing值为false,进missing组
这里主要用到了PropertyResolver#containsProperty和PropertyResolver#getProperty
另外isMatch方法也很简单,比较false和是否contains的结果
private boolean isMatch(String value, String requiredValue) {
	if (StringUtils.hasLength(requiredValue)) {
		return requiredValue.equalsIgnoreCase(value);
	}
	return !"false".equalsIgnoreCase(value);
}
最后比完之后,在determineOutcome方法中判断nonMatching组合missing组都没有,则返回匹配上,这种情况就是shouldSkip不应该被过滤的了
if (!missingProperties.isEmpty()) {
    return ConditionOutcome.noMatch(ConditionMessage.forCondition(ConditionalOnProperty.class, spec)
       .didNotFind("property", "properties")
       .items(Style.QUOTE, missingProperties));
}
if (!nonMatchingProperties.isEmpty()) {
    return ConditionOutcome.noMatch(ConditionMessage.forCondition(ConditionalOnProperty.class, spec)
       .found("different value in property", "different value in properties")
       .items(Style.QUOTE, nonMatchingProperties));
}
return ConditionOutcome
.match(ConditionMessage.forCondition(ConditionalOnProperty.class, spec).because("matched"));其中需要关注的是PropertyResolver的初始化流程,这个流程在后面自动属性配置内容中再做分析
PropertyResolver - 属性自动化配置源码分析
属性自动化配置案例
首先改造service
@Component
public class HellowServiceImpl implements HellowService{
    @Value("${study.testStr}")
    private String testStr;
    @Override
    public String sayHellow() {
        return "hellow!! " + testStr;
    }
}
补充了一个成员变量,增加@Value注解,配置值取study.testStr的值
study.testStr=this is a testStr在application.properties中增加配置。启动spring-boot,输入对应的url,可以看到输出了带有属性配置值的测试方法
点击@Value注解进去找到@Value类,发现已经是一个基础注解了
@Target({ElementType.FIELD, ElementType.METHOD, ElementType.PARAMETER, ElementType.ANNOTATION_TYPE})
@Retention(RetentionPolicy.RUNTIME)
@Documented
public @interface Value {
    String value();
}
因此直接找它的调用点,发现一个QualifierAnnotationAutowireCandidateResolver类,其中的私有成员变量是Value.class
private Class<? extends Annotation> valueAnnotationType = Value.class;参考QualifierAnnotationAutowireCandidateResolver
QualifierAnnotationAutowireCandidateResolver
findValue
protected Object findValue(Annotation[] annotationsToSearch) {
    if (annotationsToSearch.length > 0) {
       // 首先借助注解工具类找Value注解对应的属性值
       AnnotationAttributes attr = AnnotatedElementUtils.getMergedAnnotationAttributes(
             AnnotatedElementUtils.forAnnotations(annotationsToSearch), this.valueAnnotationType);
       if (attr != null) {
          // 解析属性值
          return extractValue(attr);
       }
    }
    return null;
}
可以看到核心在extractValue方法
protected Object extractValue(AnnotationAttributes attr) {
    Object value = attr.get(AnnotationUtils.VALUE);
    ……
    return value;
}解析属性值,这里解析出来,以上面案例为例,是${study.testStr},显然到这里还没有完成占位符替换的
至于findValue方法的调用点,向上可以找到QualifierAnnotationAutowireCandidateResolver#getSuggestedValue
而再向上就可以看到是DefaultListableBeanFactory#doResolveDependency
那么他是什么时候被解析成实际值的?其实还是在DefaultListableBeanFactory#doResolveDependency
Object value = getAutowireCandidateResolver().getSuggestedValue(descriptor);
if (value != null) {
    if (value instanceof String) {
       String strVal = resolveEmbeddedValue((String) value);
       BeanDefinition bd = (beanName != null && containsBean(beanName) ?
             getMergedBeanDefinition(beanName) : null);
       value = evaluateBeanDefinitionString(strVal, bd);
    }
……参考DefaultListableBeanFactory#resolveEmbeddedValue
解析流程可以继续看PropertySourcesPlaceholderConfigurer
PropertySourcesPlaceholderConfigurer - 把占位符解析器加载到BeanFactory
doProcessProperties
继承自父类PlaceholderConfigurerSupport
前面也分析过,是通过PropertySourcesPlaceholderConfigurer#doProcessProperties 方法调用beanFactoryToProcess.addEmbeddedValueResolver(valueResolver); 加载
protected void doProcessProperties(ConfigurableListableBeanFactory beanFactoryToProcess,
       StringValueResolver valueResolver) {
    ……
    // New in Spring 3.0: resolve placeholders in embedded values such as annotation attributes.
    beanFactoryToProcess.addEmbeddedValueResolver(valueResolver);
}
PropertySourcesPlaceholderConfigurer 是BeanFactoryAware和BeanFactoryPostProcessor的实现类,因此它既可以感知BeanFactory,又能在refresh阶段完成一些加载动作,参考BeanFactoryPostProcessor的简介:
然后在DefaultListableBeanFactory#addEmbeddedValueResolver 方法中把解析占位符的Resolver加载到BeanFactory中
然后在DefaultListableBeanFactory#resolveEmbeddedValue 方法中调用解析:
public String resolveEmbeddedValue(@Nullable String value) {
    ……
    for (StringValueResolver resolver : this.embeddedValueResolvers) {
       result = resolver.resolveStringValue(result);
       if (result == null) {
          return null;
       }
    }
    return result;
}可见,这里调用了resolver.resolveStringValue(result);
那么就要分析下:
这里Resolver是哪个类
resolveStringValue做了什么操作
首先第一个问题:
从doProcessProperties方法往上找PropertySourcesPlaceholderConfigurer#processProperties(点我跳转) 方法
processProperties
protected void processProperties(ConfigurableListableBeanFactory beanFactoryToProcess,
		final ConfigurablePropertyResolver propertyResolver) throws BeansException {
	propertyResolver.setPlaceholderPrefix(this.placeholderPrefix);
	propertyResolver.setPlaceholderSuffix(this.placeholderSuffix);
	propertyResolver.setValueSeparator(this.valueSeparator);
	StringValueResolver valueResolver = strVal -> {
		String resolved = (this.ignoreUnresolvablePlaceholders ?
				propertyResolver.resolvePlaceholders(strVal) :
				propertyResolver.resolveRequiredPlaceholders(strVal));
		if (this.trimValues) {
			resolved = resolved.trim();
		}
		return (resolved.equals(this.nullValue) ? null : resolved);
	};
	doProcessProperties(beanFactoryToProcess, valueResolver);
}
首先第一个点是,propertyResolver设置了默认的占位符前缀、后缀、分割符,可以看到:
/** Defaults to ${ */
protected String placeholderPrefix = DEFAULT_PLACEHOLDER_PREFIX;
/** Defaults to } */
protected String placeholderSuffix = DEFAULT_PLACEHOLDER_SUFFIX;
/** Defaults to : */
@Nullable
protected String valueSeparator = DEFAULT_VALUE_SEPARATOR;
即格式定下了
然后valueResolvers是实现了一个方法,是基于传入的propertyResolver实现的,因此继续向上看postProcessBeanFactory方法
postProcessBeanFactory
即PropertySourcesPlaceholderConfigurer实现前置处理方法的启动方法
processProperties(beanFactory, new PropertySourcesPropertyResolver(this.propertySources));
this.appliedPropertySources = this.propertySources;首先看到这两行,即使用了PropertySourcesPropertyResolver,因此继续看PropertySourcesPropertyResolver#resolveRequiredPlaceholders(点我跳转)
除了这里,前面还有一些值得关注的代码:
this.propertySources = new MutablePropertySources();
if (this.environment != null) {
	PropertyResolver propertyResolver = this.environment;
	……
	if (this.ignoreUnresolvablePlaceholders && (this.environment instanceof ConfigurableEnvironment)) {
		ConfigurableEnvironment configurableEnvironment = (ConfigurableEnvironment) this.environment;
		PropertySourcesPropertyResolver resolver =
				new PropertySourcesPropertyResolver(configurableEnvironment.getPropertySources());
		resolver.setIgnoreUnresolvableNestedPlaceholders(true);
		propertyResolver = resolver;
	}
	PropertyResolver propertyResolverToUse = propertyResolver;
	this.propertySources.addLast(
		new PropertySource<Environment>(ENVIRONMENT_PROPERTIES_PROPERTY_SOURCE_NAME, this.environment) {
			@Override
			@Nullable
			public String getProperty(String key) {
				return propertyResolverToUse.getProperty(key);
			}
		}
	);
}⾸先会通过this.environment来初始化 MutablePropertySources
这里面有几点要说明, environment是Spring属性加载的基础,⾥⾯包含 了Spring已经加载的各个属性,而之所以使用 MutablePropertySources封装,是因为 MutablePropertySources还能实现单独加载自定义的额外属性的功能。
这里environment是怎么来的:
是在SpringApplication#run (点我跳转)方法中有一个加载过程:
// org.springframework.boot.SpringApplication#run
public ConfigurableApplicationContext run(String... args) {
    ……
       ConfigurableEnvironment environment = prepareEnvironment(listeners, bootstrapContext, applicationArguments);
   ……
}
看prepareEnvironment方法
// org.springframework.boot.SpringApplication#prepareEnvironment
listeners.environmentPrepared(bootstrapContext, environment);
继续跟进会发现这里发了一个事件:
// org.springframework.boot.context.event.EventPublishingRunListener#environmentPrepared
public void environmentPrepared(ConfigurableBootstrapContext bootstrapContext,
		ConfigurableEnvironment environment) {
	multicastInitialEvent(
			new ApplicationEnvironmentPreparedEvent(bootstrapContext, this.application, this.args, environment));
}这个事件的接收方是EnvironmentPostProcessorApplicationListener
PropertySourcesPropertyResolver
继承自AbstractPropertyResolver,解析占位符相关的能力都来自父类,自己实现的则是一些加载配置文件获取kv的逻辑,例如getProperty方法
resolveRequiredPlaceholders
public String resolveRequiredPlaceholders(String text) throws IllegalArgumentException {
    if (this.strictHelper == null) {
       this.strictHelper = createPlaceholderHelper(false);
    }
    return doResolvePlaceholders(text, this.strictHelper);
}
这里首先构造了一个PropertyPlaceholderHelper,然后调用doResolvePlaceholders
private PropertyPlaceholderHelper createPlaceholderHelper(boolean ignoreUnresolvablePlaceholders) {
    return new PropertyPlaceholderHelper(this.placeholderPrefix, this.placeholderSuffix,
          this.valueSeparator, ignoreUnresolvablePlaceholders);
}
跟进createPlaceholderHelper方法可以知道是PropertyPlaceholderHelper
然后看doResolvePlaceholders
doResolvePlaceholders
private String doResolvePlaceholders(String text, PropertyPlaceholderHelper helper) {
    return helper.replacePlaceholders(text, this::getPropertyAsRawString);
}调用PropertyPlaceholderHelper#replacePlaceholders
public String replacePlaceholders(String value, PlaceholderResolver placeholderResolver) {
    Assert.notNull(value, "'value' must not be null");
    return parseStringValue(value, placeholderResolver, null);
}到了PropertyPlaceholderHelper#parseStringValue 就是解析的最底层方法了,这里不再细看,逻辑比较基础
EnvironmentPostProcessorApplicationListener
初始化environment
onApplicationEvent
public void onApplicationEvent(ApplicationEvent event) {
    if (event instanceof ApplicationEnvironmentPreparedEvent environmentPreparedEvent) {
       onApplicationEnvironmentPreparedEvent(environmentPreparedEvent);
    }
    ……
}
如果环境初始化事件,跳转onApplicationEnvironmentPreparedEvent方法
onApplicationEnvironmentPreparedEvent
private void onApplicationEnvironmentPreparedEvent(ApplicationEnvironmentPreparedEvent event) {
    ConfigurableEnvironment environment = event.getEnvironment();
    SpringApplication application = event.getSpringApplication();
    List<EnvironmentPostProcessor> postProcessors = getEnvironmentPostProcessors(application.getResourceLoader(),
          event.getBootstrapContext());
    addAotGeneratedEnvironmentPostProcessorIfNecessary(postProcessors, application);
    for (EnvironmentPostProcessor postProcessor : postProcessors) {
       postProcessor.postProcessEnvironment(environment, application);
    }
}
这里启动了EnvironmentPostProcessor启动环境初始化
这里与配置文件相关的是ConfigDataEnvironmentPostProcessor,参考ConfigDataEnvironmentPostProcessor#postProcessEnvironment(点我跳转)
ConfigDataEnvironmentPostProcessor
postProcessEnvironment
void postProcessEnvironment(ConfigurableEnvironment environment, ResourceLoader resourceLoader,
       Collection<String> additionalProfiles) {
    this.logger.trace("Post-processing environment to add config data");
    resourceLoader = (resourceLoader != null) ? resourceLoader : new DefaultResourceLoader();
    getConfigDataEnvironment(environment, resourceLoader, additionalProfiles).processAndApply();
}
核心在getConfigDataEnvironment
getConfigDataEnvironment
ConfigDataEnvironment getConfigDataEnvironment(ConfigurableEnvironment environment, ResourceLoader resourceLoader,
       Collection<String> additionalProfiles) {
    return new ConfigDataEnvironment(this.logFactory, this.bootstrapContext, environment, resourceLoader,
          additionalProfiles, this.environmentUpdateListener);
}这个方法直接返回了一个ConfigDataEnvironment
ConfigDataEnvironment
构造函数
ConfigDataEnvironment(DeferredLogFactory logFactory, ConfigurableBootstrapContext bootstrapContext,
       ConfigurableEnvironment environment, ResourceLoader resourceLoader, Collection<String> additionalProfiles,
       ConfigDataEnvironmentUpdateListener environmentUpdateListener) {
    Binder binder = Binder.get(environment);
    this.logFactory = logFactory;
    this.logger = logFactory.getLog(getClass());
    this.notFoundAction = binder.bind(ON_NOT_FOUND_PROPERTY, ConfigDataNotFoundAction.class)
       .orElse(ConfigDataNotFoundAction.FAIL);
    this.bootstrapContext = bootstrapContext;
    this.environment = environment;
    this.resolvers = createConfigDataLocationResolvers(logFactory, bootstrapContext, binder, resourceLoader);
    this.additionalProfiles = additionalProfiles;
    this.environmentUpdateListener = (environmentUpdateListener != null) ? environmentUpdateListener
          : ConfigDataEnvironmentUpdateListener.NONE;
    this.loaders = new ConfigDataLoaders(logFactory, bootstrapContext,
          SpringFactoriesLoader.forDefaultResourceLocation(resourceLoader.getClassLoader()));
    this.contributors = createContributors(binder);
}
其中比较核心的是contributors的构造,看createContributors方法
createContributors
private ConfigDataEnvironmentContributors createContributors(Binder binder) {
    ……
    List<ConfigDataEnvironmentContributor> contributors = new ArrayList<>(propertySources.size() + 10);
    ……
    contributors.addAll(getInitialImportContributors(binder));
    ……
    return createContributors(contributors);
}
跟进getInitialImportContributors方法
getInitialImportContributors
private List<ConfigDataEnvironmentContributor> getInitialImportContributors(Binder binder) {
    List<ConfigDataEnvironmentContributor> initialContributors = new ArrayList<>();
    addInitialImportContributors(initialContributors, bindLocations(binder, IMPORT_PROPERTY, EMPTY_LOCATIONS));
    addInitialImportContributors(initialContributors,
          bindLocations(binder, ADDITIONAL_LOCATION_PROPERTY, EMPTY_LOCATIONS));
    addInitialImportContributors(initialContributors,
          bindLocations(binder, LOCATION_PROPERTY, DEFAULT_SEARCH_LOCATIONS));
    return initialContributors;
}
可以看到这里定死了几个路径:
/**
 * Property used override the imported locations.
 */
static final String LOCATION_PROPERTY = "spring.config.location";
/**
 * Property used to provide additional locations to import.
 */
static final String ADDITIONAL_LOCATION_PROPERTY = "spring.config.additional-location";
/**
 * Property used to provide additional locations to import.
 */
static final String IMPORT_PROPERTY = "spring.config.import";
/**
 * Property used to determine what action to take when a
 */
static final String ON_NOT_FOUND_PROPERTY = "spring.config.on-not-found";
即如果启动时配置了spring.config.location,spring-boot环境启动的时候就优先按照这个路径加载配置文件,例如:
java -jar aaa.jar --spring.config.location=C:/application.properties
如果没有配置,下面还有一个默认的加载路径:
static final ConfigDataLocation[] DEFAULT_SEARCH_LOCATIONS;
static {
    List<ConfigDataLocation> locations = new ArrayList<>();
    locations.add(ConfigDataLocation.of("optional:classpath:/;optional:classpath:/config/"));
    locations.add(ConfigDataLocation.of("optional:file:./;optional:file:./config/;optional:file:./config/*/"));
    DEFAULT_SEARCH_LOCATIONS = locations.toArray(new ConfigDataLocation[0]);
}
默认路径是多个路径的拼接,有优先级顺序,spring-boot会根据先加载到的取值,后加载的不会覆盖新加载的。
前面还记得,SpringApplication中还有一个自定义环境加载:EnvironmentConverter#convertEnvironmentIfNecessary(点我跳转) ,这里一起对比研究
processAndApply
void processAndApply() {
    ConfigDataImporter importer = new ConfigDataImporter(this.logFactory, this.notFoundAction, this.resolvers,
          this.loaders);
    registerBootstrapBinder(this.contributors, null, DENY_INACTIVE_BINDING);
    ConfigDataEnvironmentContributors contributors = processInitial(this.contributors, importer);
    ConfigDataActivationContext activationContext = createActivationContext(
          contributors.getBinder(null, BinderOption.FAIL_ON_BIND_TO_INACTIVE_SOURCE));
    contributors = processWithoutProfiles(contributors, importer, activationContext);
    activationContext = withProfiles(contributors, activationContext);
    contributors = processWithProfiles(contributors, importer, activationContext);
    applyToEnvironment(contributors, activationContext, importer.getLoadedLocations(),
          importer.getOptionalLocations());
}其中withProfiles是做activeProfile加载
withProfiles
private ConfigDataActivationContext withProfiles(ConfigDataEnvironmentContributors contributors,
       ConfigDataActivationContext activationContext) {
    ……
       Profiles profiles = new Profiles(this.environment, binder, additionalProfiles);
    ……
}
Profiles(Environment environment, Binder binder, Collection<String> additionalProfiles) {
this.groups = binder.bind("spring.profiles.group", STRING_STRINGS_MAP).orElseGet(LinkedMultiValueMap::new);
this.activeProfiles = expandProfiles(getActivatedProfiles(environment, binder, additionalProfiles));
this.defaultProfiles = expandProfiles(getDefaultProfiles(environment, binder));
}可以看到这里从environment中获取激活的profiles了
EnvironmentConverter
convertEnvironmentIfNecessary
return convertEnvironment(environment, type);继续往下找
private ConfigurableEnvironment convertEnvironment(ConfigurableEnvironment environment,
       Class<? extends ConfigurableEnvironment> type) {
    ……
    result.setActiveProfiles(environment.getActiveProfiles());
    ……
    return result;
}
这里是在找激活的配置文件
// AbstractEnvironment#getActiveProfiles
public String[] getActiveProfiles() {
    return StringUtils.toStringArray(doGetActiveProfiles());
}
最底层是doGetActiveProfilesProperty方法
// org.springframework.core.env.AbstractEnvironment#doGetActiveProfilesProperty
protected String doGetActiveProfilesProperty() {
    return getProperty(ACTIVE_PROFILES_PROPERTY_NAME);
}原来这里加载使用的属性是public static final String ACTIVE_PROFILES_PROPERTY_NAME = "spring.profiles.active";
而convertEnvironmentIfNecessary方法构建的environment最终会被封入ConfigDataEnvironment中,在ConfigDataEnvironmentPostProcessor#postProcessEnvironment(点我跳转) 中使用
void postProcessEnvironment(ConfigurableEnvironment environment, ResourceLoader resourceLoader,
       Collection<String> additionalProfiles) {
    ……
    getConfigDataEnvironment(environment, resourceLoader, additionalProfiles).processAndApply();
}这里配置文件使用的spring.profiles.active 跟前面看到的spring.config.location 作用类似
spring官网给出说明是:如果你使用spring.config.location指定特定文件,特定文件变量(即spring.profiles.active)不会起作用,spring.config.location可以使用目录的形式指定特定文件,这样就可以使用spring.profiles.active激活特定文件变量
SpringBoot内嵌tomcat启动源码分析
AnnotationConfigServletWebServerApplicationContext
这是一种特殊的上下文类型,是一种可以在Tomcat环境下启动WebServer的上下文类型
refresh
既然是上下文,核心一定是refresh方法,继承父类的ServletWebServerApplicationContext#refresh方法
public final void refresh() throws BeansException, IllegalStateException {
    try {
       super.refresh();
    }
    catch (RuntimeException ex) {
       WebServer webServer = this.webServer;
       if (webServer != null) {
          webServer.stop();
          webServer.destroy();
       }
       throw ex;
    }
}其实也没啥东西,主要还是执行super.refresh(); 即AbstractApplicationContext#refresh
在refresh方法中,还记得第九步是一个空实现,留给子类完成定制化的特殊启动流程
onRefresh();而SpringBoot启动的这个上下文就实现了onRefresh方法,基于这里完成Tomcat的启动流程
onRefresh
继承自ServletWebServerApplicationContext#onRefresh
protected void onRefresh() {
    super.onRefresh();
    try {
       createWebServer();
    }
    catch (Throwable ex) {
       throw new ApplicationContextException("Unable to start web server", ex);
    }
}super.onRefresh();里面没啥东西,核心在createWebServer
createWebServer
createWebServer继承自ServletWebServerApplicationContext#createWebServer
ServletWebServerFactory factory = getWebServerFactory();1. 首先获取到ServletWebServer工厂
this.webServer = factory.getWebServer(getSelfInitializer());2. 构造webServer,存入成员变量,因为工厂获取到一定是Tomcat工厂,这里调用的方法就是TomcatServerletWebServerFactory#getWebServer(点我跳转)方法
getSelfInitializer().onStartup(servletContext);最后这里响应启动
getWebServerFactory
String[] beanNames = getBeanFactory().getBeanNamesForType(ServletWebServerFactory.class);
……
if (beanNames.length > 1) {
	throw new ApplicationContextException……
return getBeanFactory().getBean(beanNames[0], ServletWebServerFactory.class);
可以看出来是从spring上下文中获取ServletWebServerFactory实现bean,会判断有且仅有一个,如果超过一个就报错了
查看ServletWebServerFactory的实现类:
TomcatServletWebServerFactory等实现类是如何注册到spring中去的?其实是在ServletWebServerFactoryConfiguration中,基于spring提供的默认依赖,这里只会返回Tomcat对于的Factory
@Configuration(proxyBeanMethods = false)
class ServletWebServerFactoryConfiguration {
    @Configuration(proxyBeanMethods = false)
    @ConditionalOnClass({ Servlet.class, Tomcat.class, UpgradeProtocol.class })
    @ConditionalOnMissingBean(value = ServletWebServerFactory.class, search = SearchStrategy.CURRENT)
    static class EmbeddedTomcat {
       @Bean
       TomcatServletWebServerFactory tomcatServletWebServerFactory(
             ObjectProvider<TomcatConnectorCustomizer> connectorCustomizers,
             ObjectProvider<TomcatContextCustomizer> contextCustomizers,
             ObjectProvider<TomcatProtocolHandlerCustomizer<?>> protocolHandlerCustomizers) {
          TomcatServletWebServerFactory factory = new TomcatServletWebServerFactory();
          factory.getTomcatConnectorCustomizers().addAll(connectorCustomizers.orderedStream().toList());
          factory.getTomcatContextCustomizers().addAll(contextCustomizers.orderedStream().toList());
          factory.getTomcatProtocolHandlerCustomizers().addAll(protocolHandlerCustomizers.orderedStream().toList());
          return factory;
       }
    }
    ……
}
结合前面Condion机制,我们知道,要把EmbeddedTomcat注册成bean,条件就是发现引入了Tomcat.class、Servlet.class、、UpgradeProtocol.class这几个包
通过dependencyAnalyzer分析依赖,发现其实spring在web包下面已经默认集成了Tomcat.class依赖
TomcatServerletWebServerFactory
负责内嵌tomcat启动逻辑
成员变量包括:
// 默认协议
public static final String DEFAULT_PROTOCOL = "org.apache.coyote.http11.Http11NioProtocol";
getWebServer
Tomcat tomcat = new Tomcat();
……
// 这里是默认协议
Connector connector = new Connector(this.protocol);
……
return getTomcatWebServer(tomcat);
这里创建的Tomcat实例就是apache.catalina包下面的了
继续跟进getTomcatWebServer方法
getTomcatWebServer
protected TomcatWebServer getTomcatWebServer(Tomcat tomcat) {
    return new TomcatWebServer(tomcat, getPort() >= 0, getShutdown());
}
这里初始化了TocmatWebServer,实质上是tomcat组件Server的封装
public TomcatWebServer(Tomcat tomcat, boolean autoStart, Shutdown shutdown) {
    Assert.notNull(tomcat, "Tomcat Server must not be null");
    this.tomcat = tomcat;
    ……
    initialize();
}
可以看到构造函数中直接调用了initialize进行初始化
// org.springframework.boot.web.embedded.tomcat.TomcatWebServer#initialize
private void initialize() throws WebServerException {
	……
			// Start the server to trigger initialization listeners
			this.tomcat.start();
			……
}这里调用Tomcat#start ,逻辑实际上已经到了apache.catalina包,点进去继续看看
// org.apache.catalina.startup.Tomcat#start
public void start() throws LifecycleException {
    getServer();
    server.start();
}这里getServer() 是在创建StandardServer
// org.apache.catalina.startup.Tomcat#getServer
public Server getServer() {
    ……
server = new StandardServer();那么server.start() 实际上执行的就是StandardServer#start方法,即跳过了Tomcat启动的最开始那个main方法,而是把main方法交给spring-boot,这就是内嵌tomcat的实际逻辑,但是组件的启动和走catalina是一样的,还是比较简单的
Tomcat的启动逻辑可以参考Tomcat部分:
评论区