


本篇分析spring-MVC的源码,基础知识包括:
Servlet的概念和代码架构:
spring-MVC + servlet编程案例参考:
tomcat及源码:
ContextLoaderListener - 全局上下文初始化
MVC模式下的配置装配器,生成上下文的工具
spring-mvc架构的设计思路
java-web架构就是在tomcat容器中启动servlet,从而实现对外界请求的响应,而其中tomcat容器想知道我们要启动哪些servlet,核心配置文件就是web.xml
web.xml的解析在tomcat源码中,可以参考ContextConfig#webConfig方法,链接如下:
tomcat解析完web.xml会发一个ServletContextEvent事件,由接收方自己实现ServletContextListener完成监听并决定如何处理,而根据servletContext的相关知识,每⼀个Web应⽤都有⼀个ServletContext与之相关联,在应⽤启动时被创建,在应⽤关闭的时候被销毁,因此一般是通过servletContext存放和解析一些数据。
servletContext相关知识如下:
spring-mvc实际上就是由spring提供的监听ServletContextEvent事件后启动spring环境,同时帮用户管理servlet,简化编程的一个架构,它提供的实际上类似于一个脚手架的能力,用户就可以不用从servlet开始一层一层写,而是专心业务开发即可,开发好的业务只需要使用注解就可以关联到spring实现的servlet中
回顾下spring架构下的web.xml,需要告诉它Spring配置⽂件的位置
<!-- 使⽤ContextLoaderListener配置时,需要告诉它Spring配置⽂件的位置 -->
<context-param>
    <param-name>contextConfigLocation</param-name>
    <param-value>classpath:applicationContext.xml</param value>
</context-param>
在web环境下,肯定不能使用new ClassPathXmlApplicationContext(String path)直接注册加载一个配置xml,而是通过context-param参数在web.xml中配置监听器
ContextLoaderListener的前世今生
前面讲到spring-mvc实质上就是提供了监听ServletContextEvent事件后的处理方案,具体来说就是在servletContext中记录spring的WebApplicationContext实例,这一部分工作就是在spring自己实现的ServletContextListener中完成的,即ContextLoaderListener
ContextLoaderListener实现自ServletContextListener同时继承自ContextLoader,具备WebApplicationContext初始化能力和servletContext的处理能力
public void contextInitialized(ServletContextEvent event) {
	// 继承自ContextLoader
	initWebApplicationContext(event.getServletContext());
}
default public void contextDestroyed(ServletContextEvent sce) {}
ContextLoader
org.springframework.web.context.ContextLoader,提供WebApplicationContext的初始化能力,是ContextLoaderListener的父类
核心成员变量包括:
// 通过这个map指代当前的WebApplicationContext
private static final Map<ClassLoader, WebApplicationContext> currentContextPerThread = new ConcurrentHashMap<>(1);
initWebApplicationContext - 初始化webApplicationContext
三个流程:
容器初始化
容器配置和刷新
将容器存入ServletContext
容器初始化
这里是为了初始化spring容器,还没开始加载bean
if (this.context == null) {
    this.context = createWebApplicationContext(servletContext);
}
这里参考createWebApplicationContext
protected WebApplicationContext createWebApplicationContext(ServletContext sc) {
    // 获取contextClass
    Class<?> contextClass = determineContextClass(sc);
    if (!ConfigurableWebApplicationContext.class.isAssignableFrom(contextClass)) {
       throw new ApplicationContextException("Custom context class [" + contextClass.getName() +
             "] is not of type [" + ConfigurableWebApplicationContext.class.getName() + "]");
    }
    // 初始化
    return (ConfigurableWebApplicationContext) BeanUtils.instantiateClass(contextClass);
}
这里获取contextClass再跟进一下determineContextClass
protected Class<?> determineContextClass(ServletContext servletContext) {
    String contextClassName = servletContext.getInitParameter(CONTEXT_CLASS_PARAM);
    if (contextClassName != null) {
       // 如果指定了contextClass参数
       ……
    }
    else {
        // 如果没指定contextClass参数,先从配置文件中加载
		if (defaultStrategies == null) {
			try {
				ClassPathResource resource = new ClassPathResource(DEFAULT_STRATEGIES_PATH, ContextLoader.class);
				defaultStrategies = PropertiesLoaderUtils.loadProperties(resource);
			}
			catch (IOException ex) {
				throw new IllegalStateException("Could not load 'ContextLoader.properties': " + ex.getMessage());
			}
		}
       contextClassName = defaultStrategies.getProperty(WebApplicationContext.class.getName());
       try {
          return ClassUtils.forName(contextClassName, ContextLoader.class.getClassLoader());
       }
       catch ...
    }
}
如果没有contextClass参数,找配置文件ContextLoader.properties,里面配置是:
org.springframework.web.context.WebApplicationContext=org.springframework.web.context.support.XmlWebApplicationContext可见默认就是XmlWebApplicationContext
容器配置和刷新
容器初始化完成,开始加载bean
if (this.context instanceof ConfigurableWebApplicationContext) {
    ConfigurableWebApplicationContext cwac = (ConfigurableWebApplicationContext) this.context;
    if (!cwac.isActive()) {
       ……
       configureAndRefreshWebApplicationContext(cwac, servletContext);
    }
}具体流程参考configureAndRefreshWebApplicationContext
configureAndRefreshWebApplicationContext
if (ObjectUtils.identityToString(wac).equals(wac.getId())) {
	……
	String idParam = sc.getInitParameter(CONTEXT_ID_PARAM);
	if (idParam != null) {
		wac.setId(idParam);
	}
	else ...
}
处理的第一个参数是contextId
String configLocationParam = sc.getInitParameter(CONFIG_LOCATION_PARAM);
if (configLocationParam != null) {
    wac.setConfigLocation(configLocationParam);
}
第二个参数就是一个重要参数了,处理的是contextConfigLocation,因为是XmlWebApplicationContext,则必须有一个配置文件路径
在springMVC架构的web.xml中配置这个参数决定了spring获取xml配置文件路径的关键,只有这个参数配置正确了,spring才能正确读到xml中的各项配置和bean
ConfigurableEnvironment env = wac.getEnvironment();
if (env instanceof ConfigurableWebEnvironment) {
    ((ConfigurableWebEnvironment) env).initPropertySources(sc, null);
}
初始化环境配置参数,跟进下去看看:
public void initPropertySources(@Nullable ServletContext servletContext, @Nullable ServletConfig servletConfig) {
    WebApplicationContextUtils.initServletPropertySources(getPropertySources(), servletContext, servletConfig);
}这一部分解析在WebApplicationContextUtils#initServletPropertySources方法中:
// org.springframework.web.context.support.WebApplicationContextUtils
public static void initServletPropertySources(MutablePropertySources sources,
       @Nullable ServletContext servletContext, @Nullable ServletConfig servletConfig) {
    Assert.notNull(sources, "'propertySources' must not be null");
    String name = StandardServletEnvironment.SERVLET_CONTEXT_PROPERTY_SOURCE_NAME;
    if (servletContext != null && sources.get(name) instanceof StubPropertySource) {
       sources.replace(name, new ServletContextPropertySource(name, servletContext));
    }
    name = StandardServletEnvironment.SERVLET_CONFIG_PROPERTY_SOURCE_NAME;
    if (servletConfig != null && sources.get(name) instanceof StubPropertySource) {
       sources.replace(name, new ServletConfigPropertySource(name, servletConfig));
    }
}
可见这里分别解析了servletContextInitParams、servletConfigInitParams两个参数
回到configureAndRefreshWebApplicationContext
customizeContext(sc, wac);
wac.refresh();
最后是context的自定义逻辑,和refresh逻辑
可以看到refresh逻辑就是调用到了XmlWebApplicationContext#refresh方法,这里就真正走到了springbean的加载流程里面了,服务开始真正启动了,这里可以参考ApplicationContext部分:
DispatcherServlet - Servlet级上下文初始化
在tomcat部分可以看到,tomcat启动后会根据web.xml加载servlet,调用Servlet#init方法
回顾下java-web架构中web.xml的另一个配置:
<servlet>
    <servlet-name>Springmvc</servlet-name>
    <servlet-class>org.Springframework.web.servlet.DispatcherServlet</servlet-class>
    <load-on-startup>1</load-on-startup>
</servlet>在springMVC架构下,我们配置的是DispatcherServlet,因此调用的就是DispatcherServlet#init方法
DispatcherServlet
dispatcherServlet的上级接口中包括实HttpServlet,同样也符合servlet的特征,具备生命周期方法(init、service、destroy),同时也继承了HttpServlet在service方法中对get、post等方法的解析
看下其中对Servlet生命周期方法的实现:
init
该方法继承自父类HttpServletBean,在初始化方法中主要写了以下几个步骤:
PropertyValues pvs = new ServletConfigPropertyValues(getServletConfig(), this.requiredProperties);先把初始化参数解析出来,封装在pvs,其中ServletConfigPropertyValues是HttpServletBean的一个内部类,负责初始化参数的封装
BeanWrapper bw = PropertyAccessorFactory.forBeanPropertyAccess(this);将当前的这个servlet类转化为⼀个BeanWrapper,从而能够以Spring的⽅式来对init-param的值进行注入,如contextAttribute、contextClass、nameSpace、contextConfigLocation等,都可以在web.xml⽂件中以初始化参数的方式配置在servlet的声明中。
PropertyAccessorFactory#forBeanPropertyAccess是Spring中提供的⼯具⽅法,主要⽤于将指定实例转化为Spring中可以处理的BeanWrapper类型的实例
ResourceLoader resourceLoader = new ServletContextResourceLoader(getServletContext());
bw.registerCustomEditor(Resource.class, new ResourceEditor(resourceLoader, getEnvironment()));
注册自定义属性编辑器,解析resource类型的属性
initBeanWrapper(bw);这是一个自定义扩展点,留给子类实现
initServletBean();初始化servletBean,这里直接看父类FrameworkServlet#initServletBean的实现(点我跳转)
initServletBean
继承自父类FrameworkServlet,承担了servletBean的初始化
this.webApplicationContext = initWebApplicationContext();
initFrameworkServlet();
可以看到核心方法在initWebApplicationContext中,同时留了一个空实现给开发者自行实现子类
initWebApplicationContext
继承自父类FrameworkServlet,初始化servlet的上下文
这个方法和ContextLoader#initWebApplicationContext 好像很像,见ContextLoader
但实际上二者还是有区别的
功能上:ContextLoaderListener中创建ApplicationContext主要用于整个Web应用程序需要共享的一些组件,比如DAO,数据库的ConnectionFactory等。而由DispatcherServlet创建的ApplicationContext主要用于和该Servlet相关的一些组件,比如Controller、ViewResovler等。
作用范围上:在DispatcherServlet中可以引用由ContextLoaderListener所创建的ApplicationContext,而反过来不行。
在Spring的具体实现上:这两个ApplicationContext都是通过ServletContext的setAttribute方法放到ServletContext中的。ContextLoaderListener会先于DispatcherServlet创建ApplicationContext,DispatcherServlet在创建ApplicationContext时会先找到由ContextLoaderListener所创建的ApplicationContext,再将后者的ApplicationContext作为参数传给DispatcherServlet的
ApplicationContext#setParent方法
可以认为,一个servlet就是一个具备处理请求能力的完整小型服务,而java程序是框架,管理这些小服务,提供一些util、dao层、数据层之类的能力,这个思维模式与DDD架构是不谋而合的
WebApplicationContext rootContext =
       WebApplicationContextUtils.getWebApplicationContext(getServletContext());
先取rootWebApplicationContext,根据常数项可以看出来,这个所谓的rootWebApplicationContext就是之前在ContextLoadListener加载的时候加载的WebApplicationContext
然后开始加载子WebApplicationContext
首先判断缓存里面已经有了,直接走refresh,参考configureAndRefreshWebApplicationContext
if (this.webApplicationContext != null) {
    ……
          configureAndRefreshWebApplicationContext(cwac);
       }
    }
}
否则先创建再refresh
if (wac == null) {
    wac = findWebApplicationContext();
}
if (wac == null) {
    wac = createWebApplicationContext(rootContext);
}这里分别参考findWebApplicationContext和createWebApplicationContext
if (!this.refreshEventReceived) {
    ……
       onRefresh(wac);
    ……
}最后执行onRefresh方法加载resolver,给doService方法使用
configureAndRefreshWebApplicationContext
继承自父类
配置和刷新,⽆论是通过构造函数注⼊还是单独创建,都需要基于此方法进行配置和刷新操作。
这里也可以对比ContextLoaderListener#configureAndRefreshWebApplicationContext ,逻辑差不多
protected void configureAndRefreshWebApplicationContext(ConfigurableWebApplicationContext wac) {
    // 流程开始也是做了一些属性设置工作,把web.xml中配置的属性塞进webApplicationContext中,包括contextId、命名空间等
    if (ObjectUtils.identityToString(wac).equals(wac.getId())) {
       if (this.contextId != null) {
          wac.setId(this.contextId);
       }
       else {
          wac.setId(ConfigurableWebApplicationContext.APPLICATION_CONTEXT_ID_PREFIX +
                ObjectUtils.getDisplayString(getServletContext().getContextPath()) + '/' + getServletName());
       }
    }
    wac.setServletContext(getServletContext());
    wac.setServletConfig(getServletConfig());
    wac.setNamespace(getNamespace());
    wac.addApplicationListener(new SourceFilteringListener(wac, new ContextRefreshListener()));
    // The wac environment's #initPropertySources will be called in any case when the context
    // is refreshed; do it eagerly here to ensure servlet property sources are in place for
    // use in any post-processing or initialization that occurs below prior to #refresh
    ConfigurableEnvironment env = wac.getEnvironment();
    // 这里是判断当前的运行环境并初始化属性,包括servletContextInitParams和servletConfigInitParams两块
    if (env instanceof ConfigurableWebEnvironment) {
       ((ConfigurableWebEnvironment) env).initPropertySources(getServletContext(), getServletConfig());
    }
    // 执行自定义的扩展点用于子类扩展
    postProcessWebApplicationContext(wac);
    // 应用初始化器,本质上初始化器也是一个扩展点
    applyInitializers(wac);
    wac.refresh();
}
这里跟进看下applyInitializers方法
// -- FrameworkServlet#applyInitializers --
for (String className : StringUtils.tokenizeToStringArray(globalClassNames, INIT_PARAM_DELIMITERS)) {
	this.contextInitializers.add(loadInitializer(className, wac));
}
这里是通过loadInitializer方法加载了一些初始化器,继续跟进
// -- FrameworkServlet#loadInitializer --
return BeanUtils.instantiateClass(initializerClass, ApplicationContextInitializer.class);
可以看到只要重写ApplicationContextInitializer方法就可以作为一个自定义的初始化器被调用
这个类的主要目的就是在ConfigurableApplicationContext类型(或者子类型)的ApplicationContext做refresh之前,允许我们对ConfigurableApplicationContext的实例做进一步的设置或者处理
最后执行refresh操作刷新ApplicationContext,和前面父XmlWebApplicationContext也差不多,参考前面容器部分:
findWebApplicationContext
继承自父类
如果当前dispatcherServlet实例中的成员变量webApplicationContext中找不到已经创建好的,先调用这个方法进行找
String attrName = getContextAttribute();首先获取到contextAttribute参数,如果这个参数没有就不继续找了,如果有
WebApplicationContext wac =
                   WebApplicationContextUtils.getWebApplicationContext(getServletContext(), attrName);
基于这个参数完成初始化
createWebApplicationContext
继承自父类
该方法基于父Application创建Servlet自己的XmlWebApplicationContext
Class<?> contextClass = getContextClass();首先获取Context类型,默认XmlWebApplicationContext类型
ConfigurableWebApplicationContext wac =
       (ConfigurableWebApplicationContext) BeanUtils.instantiateClass(contextClass);
wac.setEnvironment(getEnvironment());
wac.setParent(parent);
String configLocation = getContextConfigLocation();
if (configLocation != null) {
    wac.setConfigLocation(configLocation);
}
通过spring的BeanUtils工具方法对ApplicationContext进行初始化,新建的ApplicationContext要先做一些配置
configureAndRefreshWebApplicationContext(wac);然后这里还是调用到子Servlet的configureAndRefreshWebApplicationContext进行配置和刷新操作
onRefresh
protected void onRefresh(ApplicationContext context) {
	initStrategies(context);
}onRefresh负责加载一些doDispatch过程中的resolver,其中加载的resolver在doService方法就可以用到
关注下onRefresh是怎么触发的:
可以看到有两个触发点:一个是上面看过的初始化上下文的initWebApplicationContext,另一个是一个事件接收
public void onApplicationEvent(ContextRefreshedEvent event) {
    this.refreshEventReceived = true;
    synchronized (this.onRefreshMonitor) {
       onRefresh(event.getApplicationContext());
    }
}可以看到FrameworkServlet也搞了一个实现ApplicationListener<ContextRefreshedEvent>的内部类,这个类是监听器,监听对象ContextRefreshedEvent是上下文启动的消息,可以找下容器部分:
public void onApplicationEvent(ContextRefreshedEvent event) {
    this.refreshEventReceived = true;
    synchronized (this.onRefreshMonitor) {
       onRefresh(event.getApplicationContext());
    }
}
即上下文刷新完成后,开始执行initStrategies方法
initStrategies
protected void initStrategies(ApplicationContext context) {
    initMultipartResolver(context);
    initLocaleResolver(context);
    initThemeResolver(context);
    initHandlerMappings(context);
    initHandlerAdapters(context);
    initHandlerExceptionResolvers(context);
    initRequestToViewNameTranslator(context);
    initViewResolvers(context);
    initFlashMapManager(context);
}
实现在DispatcherServlet中,把这些resolver加载好等备用,重点可以看下initHandlerMappings、initHandlerAdapters
initHandlerMappings
HandlerMapping是路径映射器,它决定了请求资源的路径映射到哪个处理链
比如样例把“/userlist.htm”映射到userController
if (this.detectAllHandlerMappings) {
    // Find all HandlerMappings in the ApplicationContext, including ancestor contexts.
    Map<String, HandlerMapping> matchingBeans =
          BeanFactoryUtils.beansOfTypeIncludingAncestors(context, HandlerMapping.class, true, false);
    ……
}
else {
    try {
       HandlerMapping hm = context.getBean(HANDLER_MAPPING_BEAN_NAME, HandlerMapping.class);
       this.handlerMappings = Collections.singletonList(hm);
    }
    ……
}detectAllHandlerMappings这个配置项判断是不是找所有的HandlerMapping,如果是,通过BeanFactoryUtils#beansOfTypeIncludingAncestors工具方法找,这个方法找所有该类型的bean,也是个挺好用的方法
如果不找所有类型,即从上下文中获取,其实就是样例中配置在xml中的
initHandlerAdapters
if (this.detectAllHandlerAdapters) {
    // Find all HandlerAdapters in the ApplicationContext, including ancestor contexts.
    Map<String, HandlerAdapter> matchingBeans =
          BeanFactoryUtils.beansOfTypeIncludingAncestors(context, HandlerAdapter.class, true, false);
    ……
}
else {
    try {
       HandlerAdapter ha = context.getBean(HANDLER_ADAPTER_BEAN_NAME, HandlerAdapter.class);
       this.handlerAdapters = Collections.singletonList(ha);
    }
    ……
}
架构和上面initHandlerMappings是差不多的
DispatcherServlet - service实现和请求处理逻辑
DispatcherServlet
service
protected void service(HttpServletRequest request, HttpServletResponse response)
       throws ServletException, IOException {
    HttpMethod httpMethod = HttpMethod.resolve(request.getMethod());
    if (httpMethod == HttpMethod.PATCH || httpMethod == null) {
       processRequest(request, response);
    }
    else {
       super.service(request, response);
    }
}如果是patch方法,直接走processRequest,否则先调父类的service
protected void service(HttpServletRequest req, HttpServletResponse resp)
    throws ServletException, IOException
{
    String method = req.getMethod();
    if (method.equals(METHOD_GET)) {
        ……
            doGet(req, resp);
        ……
    } else if (method.equals(METHOD_HEAD)) {
        ……
        doHead(req, resp);
    } else if (method.equals(METHOD_POST)) {
        doPost(req, resp);

    } else if (method.equals(METHOD_PUT)) {
        doPut(req, resp);

    } else if (method.equals(METHOD_DELETE)) {
        doDelete(req, resp);

    } else if (method.equals(METHOD_OPTIONS)) {
        doOptions(req,resp);

    } else if (method.equals(METHOD_TRACE)) {
        doTrace(req,resp);

    } else {
        // 处理error
        ……
    }
}
父类service方法通过doXX方法路由,以doGet为例
protected final void doGet(HttpServletRequest request, HttpServletResponse response)
       throws ServletException, IOException {
    processRequest(request, response);
}里面其实还是转到了processRequest方法
processRequest
继承自父类
protected final void processRequest(HttpServletRequest request, HttpServletResponse response)
       throws ServletException, IOException {
    // 做一些预处理
    ……
    try {
       // 核心方法
       doService(request, response);
    }
    catch ...
    // 做一些后处理,日志等
    finally {
       resetContextHolders(request, previousLocaleContext, previousAttributes);
       if (requestAttributes != null) {
          requestAttributes.requestCompleted();
       }
       logResult(request, response, failureCause, asyncManager);
       publishRequestHandledEvent(request, response, startTime, failureCause);
    }
}
可以看到核心在doService方法中,这是FrameworkServlet提供的一个抽象方法,即如果不直接使用spring提供的DispatcherServlet,也可以自行实现FrameServlet,实现doService方法,就可以专注于业务开发了
doService
在doService方法中把一些功能辅助工具设置到request的属性中继续往下带,方便取用,例如localeResolver、themeResolver
request.setAttribute(LOCALE_RESOLVER_ATTRIBUTE, this.localeResolver);
request.setAttribute(THEME_RESOLVER_ATTRIBUTE, this.themeResolver);
核心部分委托给doDispatch方法
try {
    doDispatch(request, response);
}这些resolver是哪里加载的呢?实际上是XmlWebApplicationContext#onRefresh方法,参考onRefresh方法,了解下其调用点
doDispatch
处理请求的最底层核心逻辑所在
doDispatch就是应用各种加载好的处理器依次处理请求的流程,一个请求需要经历的步骤如下:
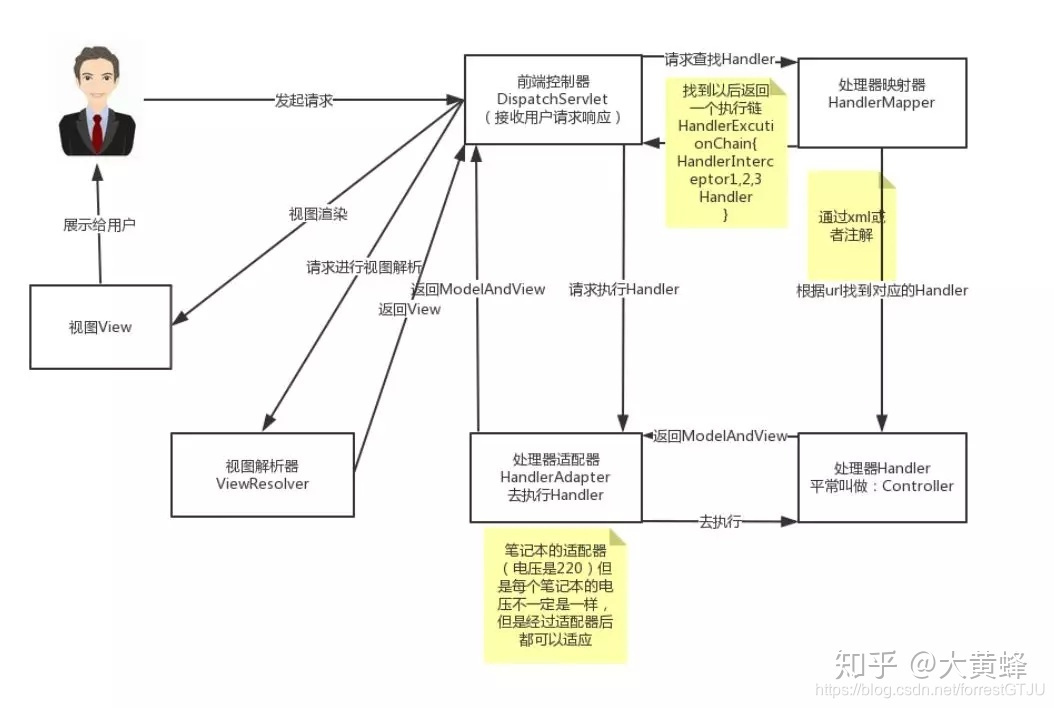
总结起来,DispatcherServlet处理Request的流程分为以下步骤:
处理分段请求
获取HandlerExecutionChain处理链
获取适配器HandlerAdpater
处理Last-Modified请求
HandlerExecutionChain的预处理
处理request与response,获取视图ModelAndView
视图解析和HandlerExecutionChain的后处理
结果处理
步骤一、处理分段请求
processedRequest = checkMultipart(request);首先判断是否是分段请求,如果是MutipartContent类型的request,转换为MultipartHttpServletRequest处理
步骤二、获取HandlerExecutionChain处理链
mappedHandler = getHandler(processedRequest);
if (mappedHandler == null) {
	noHandlerFound(processedRequest, response);
	return;
}

// --- org.springframework.web.servlet.DispatcherServlet#noHandlerFound ---
protected void noHandlerFound(HttpServletRequest request, HttpServletResponse response) throws Exception {
    if (pageNotFoundLogger.isWarnEnabled()) {
       pageNotFoundLogger.warn("No mapping for " + request.getMethod() + " " + getRequestUri(request));
    }
    if (this.throwExceptionIfNoHandlerFound) {
       throw new NoHandlerFoundException(request.getMethod(), getRequestUri(request),
             new ServletServerHttpRequest(request).getHeaders());
    }
    else {
       response.sendError(HttpServletResponse.SC_NOT_FOUND);
    }
}
根据请求类型获取HandlerExecutionChain
还记得在编写案例中,在application-context.xml中配置了一个简单的mapping
<bean id="simpleUrlMapping" class="org.Springframework.web.servlet.handler.SimpleUrlHandlerMapping">
    <property name="mappings">
        <props>
            <prop key="/userlist.htm">userController</prop>
        </props>
    </property>
</bean>可以思考下这个mapping是怎么加载进来的,参考getHandler方法
如果找不到handlerMapping,则调用noHandlerFound方法处理,可以跟进下:
可见如果找不到handler,会判断这个释放抛异常的选项,如果不开,直接返回404,我们就可以理解了,404的含义实际上就是没有这个request对应的处理器
步骤三、获取适配器HandlerAdpater
HandlerAdapter ha = getHandlerAdapter(mappedHandler.getHandler());这里通过Handler获取HandlerAdpater,主要是用来做很多预处理,参考getHandlerAdapter方法
步骤四、处理Last-Modified请求
String method = request.getMethod();
boolean isGet = HttpMethod.GET.matches(method);
if (isGet || HttpMethod.HEAD.matches(method)) {
    long lastModified = ha.getLastModified(request, mappedHandler.getHandler());
    if (new ServletWebRequest(request, response).checkNotModified(lastModified) && isGet) {
       return;
    }
}
针对Last-Modified机制进行缓存处理,Last-Modified机制的概念是
在客户端第⼀次输⼊URL时,服务器端会返回内容和状态码200,表示请求成功,同时会添加⼀个“Last-Modified”的响应头,表示此文件在服务器上的最后更新时间,例如,“Last-Modified:Wed, 14 Mar 2012 10:22:42 GMT”表示最后更新时间为(2012-03-14 10:22)
客户端第二次请求此URL时,客户端会向服务器发送请求头“If-Modified-Since”,询问服务器该时间之后当前请求内容是否有被修改过,如“If-Modified-Since: Wed, 14 Mar 2012 10:22:42GMT”,如果服务器端的内容没有变化,则⾃动返回HTTP 304状态码(只要响应头,内容为空,这样就节省了网络带宽)
步骤五、HandlerExecutionChain的预处理
if (!mappedHandler.applyPreHandle(processedRequest, response)) {
    return;
}做预处理,上面getHandler方法返回的HandlerExecutionChain封装了Handler和一些拦截器,现在就是调用HandlerExecutionChain#applyPreHandle方法(点我跳转)
步骤六、处理request与response,获取视图ModelAndView
mv = ha.handle(processedRequest, response, mappedHandler.getHandler());HandlerAdpater基于HandlerExecutionChain处理request与response,获取ModelAndView,看SimpleControllerHandlerAdapter#handle (点我跳转)
调用HandlerAdapterd#handle方法,,最简单的场景以SimpleControllerHandlerAdapter#handle为例(点我跳转),只是做一些结果处理,更复杂一些的,比如生产环境,可能包括了一些参数校验,参考RequestMappingHandlerAdapter#handle (点我跳转)
步骤七、视图解析和HandlerExecutionChain的后处理
applyDefaultViewName(processedRequest, mv);
mappedHandler.applyPostHandle(processedRequest, response, mv);视图解析,先使用默认视图,后面再解析视图。同时调用HandlerExecutionChain#postHandle方法做后处理
步骤八、结果处理
processDispatchResult(processedRequest, response, mappedHandler, mv, dispatchException);最后一步做结果处理和分析,包括异常处理、视图处理等,参考processDispatchResult方法
getHandler
protected HandlerExecutionChain getHandler(HttpServletRequest request) throws Exception {
    if (this.handlerMappings != null) {
       for (HandlerMapping mapping : this.handlerMappings) {
          HandlerExecutionChain handler = mapping.getHandler(request);
          if (handler != null) {
             return handler;
          }
       }
    }
    return null;
}handlerMappings是在initStrategies流程中加载到内存中的,其中调用initHandlerMappings方法
默认的映射方法是SimpleUrlHandlerMapping,而它的getHandler方法是从父类AbstractHandlerMapping中直接继承过来的
getHandlerAdapter
protected HandlerAdapter getHandlerAdapter(Object handler) throws ServletException {
    if (this.handlerAdapters != null) {
       for (HandlerAdapter adapter : this.handlerAdapters) {
          if (adapter.supports(handler)) {
             return adapter;
          }
       }
    }
    throw new ServletException("No adapter for handler [" + handler +
          "]: The DispatcherServlet configuration needs to include a HandlerAdapter that supports this handler");
}逻辑和getHandler差不多,也是在initStrategies流程中加载到内存中的,其中调用initHandlerAdapters方法
默认的调用到SimpleControllerHandlerAdapter方法
processDispatchResult
if (exception != null) {
    ……
    mv = processHandlerException(request, response, handler, exception);
首先是异常处理
if (mv != null && !mv.wasCleared()) {
    render(mv, request, response);
然后处理视图
processHandlerException
for (HandlerExceptionResolver resolver : this.handlerExceptionResolvers) {
exMv = resolver.resolveException(request, response, handler, ex);遍历异常处理器,处理器也是在initStrategies流程加载的,应用异常处理器的resolveException方法,获取异常视图。参考DefaultHandlerExceptionResolver
render
view = resolveViewName(viewName, mv.getModelInternal(), locale, request);第一步是解析视图名称,参考resolveViewName
view.render(mv.getModelInternal(), request, response);然后是做页面跳转引导,调用InternalResourceView#render方法(点我跳转)
resolveViewName
for (ViewResolver viewResolver : this.viewResolvers) {
View view = viewResolver.resolveViewName(viewName, locale);通过initStratigies流程预加载的viewResolvers处理视图名称,参考InternalResourceViewResolver#resolveViewName (点我跳转)
然后看下viewResolver又是哪来的:
private void initViewResolvers(ApplicationContext context) {
   ……
       this.viewResolvers = getDefaultStrategies(context, ViewResolver.class);
   ……
}
如果没有特殊配置,也是通过默认策略加载
protected <T> List<T> getDefaultStrategies(ApplicationContext context, Class<T> strategyInterface) {
    ……
          ClassPathResource resource = new ClassPathResource(DEFAULT_STRATEGIES_PATH, DispatcherServlet.class);
    ……
}
即DispatcherServlet.properties文件中配置的默认值InternalResourceViewResolver
org.springframework.web.servlet.ViewResolver=org.springframework.web.servlet.view.InternalResourceViewResolverServletConfigPropertyValues
负责初始化参数的封装,在构造函数中除了封装属性,还有对属性的验证功能。它继承自MutablePropertyValues,因此它有核心成员变量:
private final List<PropertyValue> propertyValueList;存放servlet的初始化init-param中报错的属性和值
PropertyValues pvs = new ServletConfigPropertyValues(getServletConfig(), this.requiredProperties);在调用点传入了一个requiredProperties
protected final void addRequiredProperty(String property) {
	this.requiredProperties.add(property);
}
这个list是通过add方法传入的,这里明确了是留给子类去自行实现绝对哪些属性是必填的
而在ServletConfigPropertyValues的构造函数中,这个list被封装成了missingProps集合
Enumeration<String> paramNames = config.getInitParameterNames();
……
addPropertyValue(new PropertyValue(property, value));
if (missingProps != null) {
	missingProps.remove(property);
}
这里拿到了property和value后,先执行add方法存到内存中,另外还通过missingProps进行校验。而在add方法中就是加入到了propertyValueList这个属性中。
SimpleUrlHandlerMapping
简单URL路径映射器
getHandler
继承自AbstractHandlerMapping
Object handler = getHandlerInternal(request);首先根据request信息获取handler,getHandlerInternal是在AbstractHandlerMapping中的实现方法,但是在SimpleUrlHandlerMapping中并没有实现,即这里一定获取不到
但是相应的,RequestMappingHandlerMapping有一个实现,用于使用@Request注解标注路径所对应的具体处理方法
if (handler == null) {
	handler = getDefaultHandler();
}
……
handler = obtainApplicationContext().getBean(handlerName);
如果根据request获取不到,则取默认的处理器,然后从上下文中获取handler对应的bean
HandlerExecutionChain executionChain = getHandlerExecutionChain(handler, request);
……
return executionChain;构造处理链,参考getHandlerExecutionChain
getHandlerExecutionChain
protected HandlerExecutionChain getHandlerExecutionChain(Object handler, HttpServletRequest request) {
    HandlerExecutionChain chain = (handler instanceof HandlerExecutionChain ?
          (HandlerExecutionChain) handler : new HandlerExecutionChain(handler));
    for (HandlerInterceptor interceptor : this.adaptedInterceptors) {
       if (interceptor instanceof MappedInterceptor) {
          MappedInterceptor mappedInterceptor = (MappedInterceptor) interceptor;
          if (mappedInterceptor.matches(request)) {
             chain.addInterceptor(mappedInterceptor.getInterceptor());
          }
       }
       else {
          chain.addInterceptor(interceptor);
       }
    }
    return chain;
}从adaptedInterceptors中加载处理器,adaptedInterceptors也是在initStrategies流程中加载的,这里看代码并不复杂,就是遍历拦截器列表,看看是否能匹配当前的request,内部也是通过路径相关的属性匹配的
处理器实际上就是用于在处理web请求前后拦截做额外操作的,即类似切面的逻辑。spring通过接口将其暴露出来,参考HandlerInterceptor
最后把这些处理器封装在前面获取的Handler中,封装成一个chain,即HandlerExecutionChain,在doDispatch时会调用其applyPreHandle方法
RequestMappingHandlerMapping
是一个更高级的处理链获取器,它提供了根据@Request注解的路径获取对于处理器的能力,因为它实现了getHandlerInternal方法
回想tomcat的架构,是Server、Service、Connector、Container(Engine、Host、Context、Wrapper)、Executor几个层次,虽然tomcat自带分布式的能力,但是目前往往都使用cloud架构进行分布式,因此tomcat中一般只启动一个服务,也就是说,一个tomcat中只运行了一个service,使用http或https的connector,只有一个container,其中对应一个Engine,同样只有一个Host,即请求这个ip:port一定会转发到这个服务,继续向下,启动了一个context,同时对应激活了该服务唯一的servlet,以spring为例启动的是dispatcherServlet
到这时请求以RestFul的形式发送,通过HOST判定了ip,通过connector判定了port,投入了dispatcherServlet的service方法,service方法运行到initStrategies,有一步到了加载Mapping,服务中用@RequestMapping注解标注了路径,到这里就被加载了。
getHandlerInternal
继承自AbstractHandlerMethodMapping
String lookupPath = initLookupPath(request);
……
HandlerMethod handlerMethod = lookupHandlerMethod(lookupPath, request);
先取请求路径,然后委托lookupHandlerMethod,继续跟进
// lookupHandlerMethod
List<T> directPathMatches = this.mappingRegistry.getMappingsByDirectPath(lookupPath);
可以看到这里从先前注册的键值对mapping-method中获取对应的method作为handler了,继续跟进
// getMappingsByDirectPath
public List<T> getMappingsByDirectPath(String urlPath) {
	return this.pathLookup.get(urlPath);
}
可以看出数据是从pathLookup里面取出来的
private final MultiValueMap<String, T> pathLookup = new LinkedMultiValueMap<>();

public interface MultiValueMap<K, V> extends Map<K, List<V>>
这个MultiValueMap是一个Map的实现,即String对应List,即path与method链的对应,既然已经了解到其加载到内存的承载,就可以进一步找一下是如何加载的
afterPropertiesSet
public abstract class AbstractHandlerMethodMapping<T> extends AbstractHandlerMapping implements InitializingBean父类AbstractHandlerMethodMapping实现了InitailizingBean,那么就去找下afterPropertiesSet方法
public void afterPropertiesSet() {
    initHandlerMethods();
}可知加载处理链的思路是通过bean初始化三部曲之后的后置方法进行实现的,继续看initHandlerMethods
initHandlerMethods
protected void initHandlerMethods() {
	for (String beanName : getCandidateBeanNames()) {
		if (!beanName.startsWith(SCOPED_TARGET_NAME_PREFIX)) {
			processCandidateBean(beanName);
		}
	}
	handlerMethodsInitialized(getHandlerMethods());
}
首先是一个for循环,调用getCandidateBeanNames把所有候选bean拿到,然后执行processCandidateBean处理
最后一行实际上只是做了一下数据收集和日志输出
首先先看下getCandidateBeanNames
protected String[] getCandidateBeanNames() {
    return (this.detectHandlerMethodsInAncestorContexts ?
          BeanFactoryUtils.beanNamesForTypeIncludingAncestors(obtainApplicationContext(), Object.class) :
          obtainApplicationContext().getBeanNamesForType(Object.class));
}
里面实际没啥东西,看上去是找的全体Object实现类
下面processCandidateBean才是关键
processCandidateBean
protected void processCandidateBean(String beanName) {
    Class<?> beanType = null;
    try {
       beanType = obtainApplicationContext().getType(beanName);
    }
    catch (Throwable ex) {
       // An unresolvable bean type, probably from a lazy bean - let's ignore it.
       if (logger.isTraceEnabled()) {
          logger.trace("Could not resolve type for bean '" + beanName + "'", ex);
       }
    }
    // 核心1:判断是否满足
    if (beanType != null && isHandler(beanType)) {
       // 核心2:处理
       detectHandlerMethods(beanName);
    }
}其中判断参考isHandler,处理参考detectHandlerMethods
isHandler
protected boolean isHandler(Class<?> beanType) {
    return (AnnotatedElementUtils.hasAnnotation(beanType, Controller.class) ||
          AnnotatedElementUtils.hasAnnotation(beanType, RequestMapping.class));
}
到这里就很有意思了,我们看到了MVC开发过程中的老朋友,即@Controller和@RequestMapping注解
即有这两个注解都会被识别成是servlet用于处理外部请求的方法,并被加载成bean
detectHandlerMethods
上面筛选出了有@Controller和@RequestMapping的bean
protected void detectHandlerMethods(Object handler) {
    // 拿type
    Class<?> handlerType = (handler instanceof String ?
          obtainApplicationContext().getType((String) handler) : handler.getClass());
    if (handlerType != null) {
       Class<?> userType = ClassUtils.getUserClass(handlerType);
       // 遍历方法
       Map<Method, T> methods = MethodIntrospector.selectMethods(userType,
             (MethodIntrospector.MetadataLookup<T>) method -> {
                try {
                   // 处理
                   return getMappingForMethod(method, userType);
                }
                catch (Throwable ex) {
                   throw new IllegalStateException("Invalid mapping on handler class [" +
                         userType.getName() + "]: " + method, ex);
                }
             });
       ……
       methods.forEach((method, mapping) -> {
          Method invocableMethod = AopUtils.selectInvocableMethod(method, userType);
          registerHandlerMethod(handler, invocableMethod, mapping);
       });
    }
}
首先拿到bean对应的类,结果是一个反射的Class对象
然后遍历各个方法method,调用getMappingForMethod,参数分别传入这个Method对象和类型对象
protected RequestMappingInfo getMappingForMethod(Method method, Class<?> handlerType) {
    RequestMappingInfo info = createRequestMappingInfo(method);
    if (info != null) {
       RequestMappingInfo typeInfo = createRequestMappingInfo(handlerType);
       ……
    }
    return info;
}
分别尝试基于method和类构造RequestMapping对象,如果method构造不出来(可能是@RequestMapping在类上),才考虑用类构造
private RequestMappingInfo createRequestMappingInfo(AnnotatedElement element) {
    RequestMapping requestMapping = AnnotatedElementUtils.findMergedAnnotation(element, RequestMapping.class);
    RequestCondition<?> condition = (element instanceof Class ?
          getCustomTypeCondition((Class<?>) element) : getCustomMethodCondition((Method) element));
    return (requestMapping != null ? createRequestMappingInfo(requestMapping, condition) : null);
}继续看里面,这里就是使用的工具类AnnotatedElementUtils#findMergedAnnotation ,它的作用就是找类或方法上的注解,然后封装成注解对应的实例,即如果有@RequestMapping注解,将它封装在实例里面,而路径就被封装在path和value两个属性中
这里拿到路径信息后,返回到detectHandlerMethods方法,继续走registerHandlerMethod(handler, invocableMethod, mapping)这个流程注册
protected void registerHandlerMethod(Object handler, Method method, T mapping) {
    this.mappingRegistry.register(mapping, handler, method);
}
public void register(T mapping, Object handler, Method method) {
this.readWriteLock.writeLock().lock();
try {
HandlerMethod handlerMethod = createHandlerMethod(handler, method);
……
this.pathLookup.add(path, mapping);
……
finally {
this.readWriteLock.writeLock().unlock();
}
}可以看到首先把类和方法封装成了HandlerMethod,即前面要拿的Handler,然后存到pathLookup,到这里就获取到了path和method的对应关系
SimpleControllerHandlerAdapter
SimpleControllerHandlerAdapter是spring提供的最简单的Controller适配器,它的作用就是拿着Controller去解析request
supports
public boolean supports(Object handler) {
	return (handler instanceof Controller);
}
只要是Controller的实现类都可以,说明这个适配器就是为了处理普通web请求的
且对于SpringMVC来说,我们会把逻辑封装至Controller的⼦类中,例如我们之前的示例UserController就是继承自AbstractController,而AbstractController实现Controller接⼝
handle
public ModelAndView handle(HttpServletRequest request, HttpServletResponse response, Object handler)
       throws Exception {
    return ((Controller) handler).handleRequest(request, response);
}这里传进来的handler是doDispatch方法中构造的HandlerExecutionChain,调用HandlerExecutionChain#getHandler方法取出其中的handler,而它的传入,顺着doDispatch方法一直找到AbstractHandlerMapping#getHandlerExecutionChain 就能看到,参考SimpleUrlHandlerMapping
而再看方法,拿到Handler之后,将其强转成Controller,调用其handleRequest方法处理请求。
正常情况下SpringMVC模型下handler是我们实现的Controller,参考前面的UserController案例,调用其中的handleRequest方法,不重写的话,默认调用的是AbstractController中
而在生产环境中,启用的Adapter一般是RequestMappingHandlerAdapter,其实现的handle方法与SimpleControllerHandlerAdapter不同,参考RequestMappingHandlerAdapter部分
HandlerExecutionChain
applyPreHandle
预处理
if (!interceptor.preHandle(request, response, this.handler)) {
	triggerAfterCompletion(request, response, null);
	return false;
}
this.interceptorIndex = i;
预处理时取其中封装的interceptor,调用拦截器的preHandle方法,如果处理失败,直接跳转到trigerAfterCompletion做结果处理
封装是在AbstractHandlerMapping#getHandler ,参考SimpleUrlHandlerMapping
HandlerInterceptor
处理拦截器
SpringMVC提供这个接口用于在处理Web请求前后进行拦截做额外操作,拦截处理器要实现preHandle、postHandle、afterCompletion三个回调方法,例如下案例:
public class MyTestInterceptor implements HandlerInterceptor {
    public boolean preHandle(HttpServletRequest request, HttpServletResponse response, Object handler) {
        long startTime = System.currentTimeMillis();
        request.setAttribute("startTime", startTime);
        return true;
    }

    public void postHandle(HttpServletRequest request, HttpServletResponse response, Object handler, ModelAndView modelAndView) {
        long startTime = (Long) request.getAttribute("startTime");
        request.removeAttribute("startTime");
        long endTime = System.currentTimeMillis();
        modelAndView.addObject("handlingTime", endTime - startTime);
    }

    public void afterCompletion(HttpServletRequest request, HttpServletResponse response, Object handler, Exception ex) {

    }
}
在preHandle中记录一下开始处理的时间,而在postHandle方法中记录了耗时,并将结果记录在modelAndView中
AbstractController
Spring-MVC模式下Controller的抽象父类
handleRequest
handlerRequest是核心方法,如果自己实现的Controller不实现该方法,则默认调用父类的
public ModelAndView handleRequest(HttpServletRequest request, HttpServletResponse response)
       throws Exception {
    ……
    // 请求校验和返回值预处理
    checkRequest(request);
    prepareResponse(response);
    // 处理请求
    ……
    return handleRequestInternal(request, response);
}
其中,handleRequestInternal必须由子类自行实现,即提供request处理和response封装的能力,也可以参考前面实现的UserController
DefaultHandlerExceptionResolver
异常处理器,继承自接口HandlerExceptionResolver,其默认提供的异常处理类有AbstractExceptionResolver和DefaultHandlerExceptionResolver,如果需要自定义实现,可以通过bean配置的形式加载:
<bean id="exceptionHandler" class="com.test.exception.MyExceptionHandler"/>resolveException
if (shouldApplyTo(request, handler)) {
    prepareResponse(ex, response);
    ModelAndView result = doResolveException(request, response, handler, ex);
    if (result != null) {
       // Print debug message when warn logger is not enabled.
       if (logger.isDebugEnabled() && (this.warnLogger == null || !this.warnLogger.isWarnEnabled())) {
          logger.debug(buildLogMessage(ex, request) + (result.isEmpty() ? "" : " to " + result));
       }
       // Explicitly configured warn logger in logException method.
       logException(ex, request);
    }
    return result;
}
主体框架不复杂,首先判断异常处理器是否适用于当前请求,然后预准备response,调用doResolveException方法处理异常,最后打印异常,具体方法参考doResolve方法
doResolve
框架就是依次判断异常类型,返回对应的错误码,举个例子,以NoHandlerFoundException类型为例:
else if (ex instanceof NoHandlerFoundException) {
    return handleNoHandlerFoundException(
          (NoHandlerFoundException) ex, request, response, handler);
}
调用到handleNoHandlerFoundException处理,继续跟进
protected ModelAndView handleNoHandlerFoundException(NoHandlerFoundException ex,
       HttpServletRequest request, HttpServletResponse response, @Nullable Object handler) throws IOException {
    pageNotFoundLogger.warn(ex.getMessage());
    response.sendError(HttpServletResponse.SC_NOT_FOUND);
    return new ModelAndView();
}
即找不到Handler回直接记录错误值
public static final int SC_NOT_FOUND = 404;即熟知的404,可见404的含义就是找不到请求路径对应的处理器
RequestMappingHandlerAdapter
handle
RequestMappingHandlerAdapter#handle 方法直接继承自父类AbstractHandlerMethodAdapter
public final ModelAndView handle(HttpServletRequest request, HttpServletResponse response, Object handler)
       throws Exception {
    return handleInternal(request, response, (HandlerMethod) handler);
}
看handleInternal,是RequestMappingHandlerAdapter的核心处理逻辑
handleInternal
也是在做方法反射,获取ModelAndView的过程,但是中间多了一些校验之类的流程,同时支持对Hibernate框架@Valid、@Validate注解的支持
ModelAndView mav;
checkRequest(request);
首先做请求检查,在这里先做了一些最基础的check,包括request的method,和session,不包括参数校验。
mav = invokeHandlerMethod(request, response, handlerMethod);核心处理方法委托给invokeHandlerMethod,入参handlerMethod就是获取的处理器Handler
继续跟进invokeHandlerMethod方法,其中很多设置和判断忽略,看到最核心的就是
ServletWebRequest webRequest = (asyncWebRequest instanceof ServletWebRequest ?
		(ServletWebRequest) asyncWebRequest : new ServletWebRequest(request, response));
……

ServletInvocableHandlerMethod invocableMethod = createInvocableHandlerMethod(handlerMethod);
……
ModelAndViewContainer mavContainer = new ModelAndViewContainer();
……
invocableMethod.invokeAndHandle(webRequest, mavContainer);方法中做了参数和返回值的封装,然后调用ServletInvocableHandlerMethod#invokeAndHandle方法(点我跳转),其中invocableMethod是外面的Handler封装的
ServletInvocableHandlerMethod
invokeAndHandle
方法看上去比较复杂,但是核心实际上就两行:
Object returnValue = invokeForRequest(webRequest, mavContainer, providedArgs);处理请求
this.returnValueHandlers.handleReturnValue(
       returnValue, getReturnValueType(returnValue), mavContainer, webRequest);
处理返回结果
invokeForRequest
继承自父类InvocableHandlerMethod
Object[] args = getMethodArgumentValues(request, mavContainer, providedArgs);首先获取方法参数
return doInvoke(args);反射方法执行
反射执行这块其实没什么复杂的,核心内容在获取方法参数部分
getMethodArgumentValues
MethodParameter[] parameters = getMethodParameters();首先获取参数并封装起来
for (int i = 0; i < parameters.length; i++) {
    ……
    try {
       args[i] = this.resolvers.resolveArgument(parameter, mavContainer, request, this.dataBinderFactory);
    }
    ……
}然后调用自己的成员变量resolvers执行参数解析,所以这个resolvers是哪里来的,其实是在前面RequestMappingHandlerAdapter#invokeHandlerMethod中,见handleInternal方法
ServletInvocableHandlerMethod invocableMethod = createInvocableHandlerMethod(handlerMethod);
if (this.argumentResolvers != null) {
    invocableMethod.setHandlerMethodArgumentResolvers(this.argumentResolvers);
}
if (this.returnValueHandlers != null) {
	invocableMethod.setHandlerMethodReturnValueHandlers(this.returnValueHandlers);
}
即这里配置的是RequestMappingHandlerAdapter中的argumentResolvers属性,而这个又是哪里来的,实际上就是调用方引入时自行选择的,其类型是HandlerMethodArgumentResolverComposite
private HandlerMethodArgumentResolverComposite argumentResolvers;那么继续看HandlerMethodArgumentResolverComposite#resolveArgument (点我跳转)
HandlerMethodArgumentResolverComposite
resolveArgument
public Object resolveArgument(MethodParameter parameter, @Nullable ModelAndViewContainer mavContainer,
       NativeWebRequest webRequest, @Nullable WebDataBinderFactory binderFactory) throws Exception {
    HandlerMethodArgumentResolver resolver = getArgumentResolver(parameter);
    if (resolver == null) {
       throw new IllegalArgumentException("Unsupported parameter type [" +
             parameter.getParameterType().getName() + "]. supportsParameter should be called first.");
    }
    return resolver.resolveArgument(parameter, mavContainer, webRequest, binderFactory);
}
首先调用getArgumentResolver获取解析器,然后调用resolveArgument解析
跟进getArgumentResolver看下
private HandlerMethodArgumentResolver getArgumentResolver(MethodParameter parameter) {
    HandlerMethodArgumentResolver result = this.argumentResolverCache.get(parameter);
    if (result == null) {
       for (HandlerMethodArgumentResolver resolver : this.argumentResolvers) {
          if (resolver.supportsParameter(parameter)) {
             result = resolver;
             this.argumentResolverCache.put(parameter, result);
             break;
          }
       }
    }
    return result;
}
优先从缓存取,没有的话遍历argumentResolvers,这是一个接口,提供的能力即判断是否支撑的supportsParameter和解析的resolveArgument
public interface HandlerMethodArgumentResolver {

    boolean supportsParameter(MethodParameter parameter);

    @Nullable
    Object resolveArgument(MethodParameter parameter, @Nullable ModelAndViewContainer mavContainer,
          NativeWebRequest webRequest, @Nullable WebDataBinderFactory binderFactory) throws Exception;
}而@Valid这个常用注解就是基于HandlerMethodArgumentResolver接口实现的,对应实现类为RequestResponseBodyMethodProcessor
RequestResponseBodyMethodProcessor
@Valid校验参数的主体方法,重点了解下spring是怎么通过@Valid处理参数的,并且如何引入Hibernate框架
resolveArgument
WebDataBinder binder = binderFactory.createBinder(webRequest, arg, name);
if (arg != null) {
    validateIfApplicable(binder, parameter);
    if (binder.getBindingResult().hasErrors() && isBindExceptionRequired(binder, parameter)) {
       throw new MethodArgumentNotValidException(parameter, binder.getBindingResult());
    }
}
这里可以看到validateIfApplicable是做校验的方法
validateIfApplicable
Annotation[] annotations = parameter.getParameterAnnotations();首先先找到参数上的注解
for (Annotation ann : annotations) {
    Object[] validationHints = ValidationAnnotationUtils.determineValidationHints(ann);
    if (validationHints != null) {
       binder.validate(validationHints);
       break;
    }
}首先是判定注解,符合判定的话调用validate方法校验,这里先看spring的DataBinder
然后跟进ValidationAnnotationUtils#determineValidationHints
public static Object[] determineValidationHints(Annotation ann) {
    // Direct presence of @Validated ?
    if (ann instanceof Validated) {
       return ((Validated) ann).value();
    }
    // Direct presence of @Valid ?
    Class<? extends Annotation> annotationType = ann.annotationType();
    if ("javax.validation.Valid".equals(annotationType.getName())) {
       return EMPTY_OBJECT_ARRAY;
    }
    ……
    // No validation triggered
    return null;
}
判定方法中可以看到对具体注解的分析,这里把@Valid和@Validate都包含了
后面还有对自定义注解的支持
DataBinder
validate
for (Validator validator : getValidators()) {
    ……
    else if (validator != null) {
       validator.validate(target, bindingResult);
    }
}获取校验器以及调用校验方法,先看getValidators
注册到的是spring封装Hibernate框架的校验器SpringValidatorAdaptor
跟进SpringValidatorAdaptor#validate
processConstraintViolations(
this.targetValidator.validate(target, asValidationGroups(validationHints)), errors);在目标方法中,调用了targetValidator的validate方法,这里就到了Hibernate框架补链接的实现方法了,可以参考后面
而关注下Hibernate的实现方法是如何被加载到spring中的,其实是可以通过spring-boot项目的spring-boot-starter-validation包,通过ValidationAutoConfiguration把它进入到spring体系中。
getValidators
public List<Validator> getValidators() {
    return Collections.unmodifiableList(this.validators);
}
取的是validators属性,即spring封装Hibernate框架的校验器SpringValidatorAdaptor
InternalResourceViewResolver
spring预置的视图解析器提供的功能主要考虑到以下几个方面:
基于效率的考虑,提供了缓存的⽀持
提供了对redirect:xx和forward:xx前缀的⽀持
添加了前缀及后缀,并向View中加⼊了必需的属性设置
resolveViewName
继承自AbstractCachingViewResolver,即提供了解析视图时的缓存能力
if (!isCache()) {
	return createView(viewName, locale);
如果不使用缓存,则直接调用createView新建视图,否则先走缓存,创建兜底
Object cacheKey = getCacheKey(viewName, locale);
View view = this.viewAccessCache.get(cacheKey);
if (view == null) {
	……
			view = createView(viewName, locale);
    ……
}
createView
继承自UrlBasedViewResolver,提供了基于Url进行视图创建解析,是默认解析器
if (viewName.startsWith(REDIRECT_URL_PREFIX)) {
	……
if (viewName.startsWith(FORWARD_URL_PREFIX)) {
	……
首先处理redirect:xx的情况和forward:xx的情况
return super.createView(viewName, locale);如果都不符合,基于父类createView方法调用loadView方法继续创建,向上追溯:
// ---- AbstractCachingViewResolver ----
protected View createView(String viewName, Locale locale) throws Exception {
    return loadView(viewName, locale);
}
调用到loadView方法
loadView
AbstractCachingViewResolver提供的抽象方法,也是UrlBasedViewResolver自行实现的
protected View loadView(String viewName, Locale locale) throws Exception {
    AbstractUrlBasedView view = buildView(viewName);
    View result = applyLifecycleMethods(viewName, view);
    return (view.checkResource(locale) ? result : null);
}
buildView方法创建视图并配置了相应的属性,创建的是一个AbstractUrlBasedView实例,这明显是个抽象类,那么具体创建的是啥呢?
protected AbstractUrlBasedView buildView(String viewName) throws Exception {
    AbstractUrlBasedView view = instantiateView();
    ……
可以看到buildView中创建是这一句,下面都是在配置,继续跟进
protected AbstractUrlBasedView instantiateView() {
    Class<?> viewClass = getViewClass();
    ……
}
protected Class<?> getViewClass() {
return this.viewClass;
}即获取的是viewClass属性,这里属性是哪里来的?对setViewClass做ctrl+alt+H分析,发现在InternalResourceViewResolver类中是有调用,即其构造函数:
public InternalResourceViewResolver() {
    Class<?> viewClass = requiredViewClass();
    if (InternalResourceView.class == viewClass && jstlPresent) {
       viewClass = JstlView.class;
    }
    setViewClass(viewClass);
}
跟进requiredViewClass方法
protected Class<?> requiredViewClass() {
    return InternalResourceView.class;
}
可知拿到的实际上是InternalResourceView类型
回到初始流程,applyLifecycleMethods方法调用initializeBean在spring上下文中对视图完成了初始化
protected View applyLifecycleMethods(String viewName, AbstractUrlBasedView view) {
    ApplicationContext context = getApplicationContext();
    if (context != null) {
       Object initialized = context.getAutowireCapableBeanFactory().initializeBean(view, viewName);
       if (initialized instanceof View) {
          return (View) initialized;
       }
    }
    return view;
}
InternalResourceView
render
方法继承自AbstractView,简单看下方法是如何引导视图页面跳转的
public void render(@Nullable Map<String, ?> model, HttpServletRequest request,
       HttpServletResponse response) throws Exception {
    if (logger.isDebugEnabled()) {
       logger.debug("View " + formatViewName() +
             ", model " + (model != null ? model : Collections.emptyMap()) +
             (this.staticAttributes.isEmpty() ? "" : ", static attributes " + this.staticAttributes));
    }
    // 1.创建合并模型
    Map<String, Object> mergedModel = createMergedOutputModel(model, request, response);
    // 2.准备响应,为了解决 IE 通过 HTTPS 下载 Bug
    prepareResponse(request, response);
    // 3.空方法,表示真正的视图渲染
    renderMergedOutputModel(mergedModel, getRequestToExpose(request), response);
}
评论区